> ## Documentation Index
> Fetch the complete documentation index at: https://docs.enterprise.emailmeter.com/llms.txt
> Use this file to discover all available pages before exploring further.
# Integrate Microsoft SSO with Google
> Enable users to login with their Microsoft SSO
 At Email Meter, we use [Looker Studio](https://cloud.google.com/looker-studio?hl=es) to power our email statistics dashboards. [Looker Studio](https://cloud.google.com/looker-studio?hl=es) is a modern BI & analytics platform used to tell stories with data.
To view your company's email statistics dashboard in Looker Studio, **users will need to be signed into a Google account**.
With this guide, you will learn how to integrate Google with Microsoft Entra ID. After completing these steps, users will be able to sign-in to Email Meter with Google using their existing Microsoft SSO.
To follow this guide, you will need administrator permissions on both Microsoft and Google admin panels.
## Requirements
To get started, you will need:
* A Microsoft 365 subscription
* A Google Workspace tenant
If you don't have a Google Workspace tenant, you can contact us to help you set one up. Alternatively, we can offer a Google Workspace tenant managed by Email Meter to set up your SSO.
## Instructions
### Create a SAML profile in Google Workspace
* Open a new tab in your browser, and sign in to the [Google Admin](https://admin.google.com).
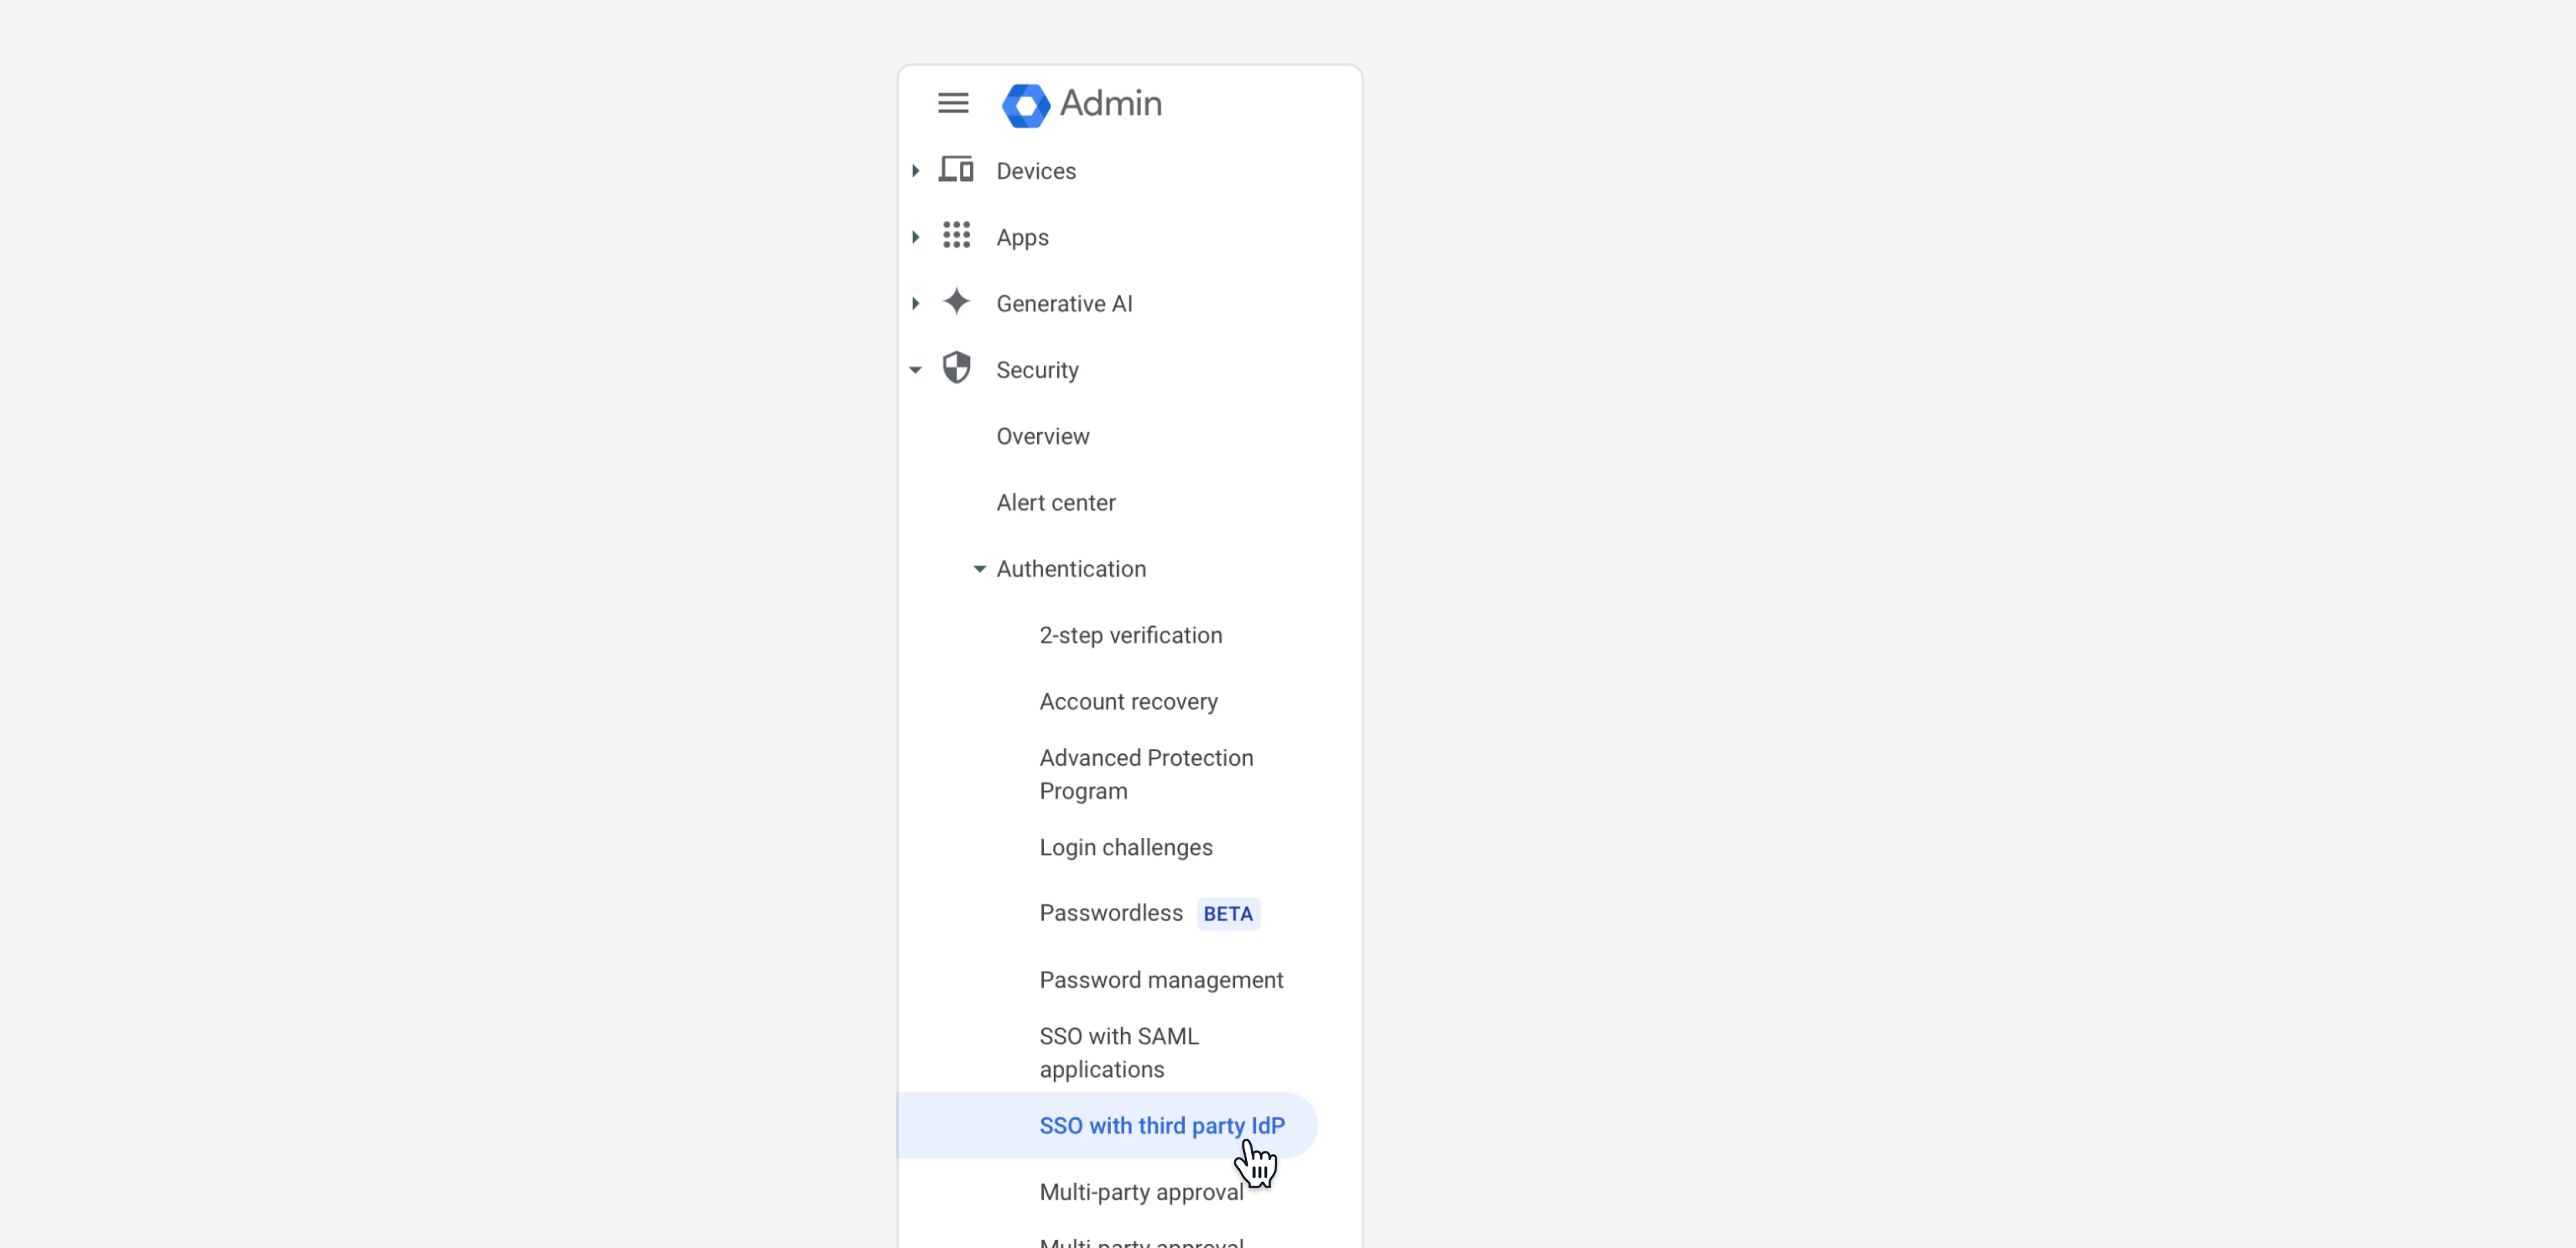
* On the left sidebar, go to `Security > Authentication > SSO with third party IdP`.
At Email Meter, we use [Looker Studio](https://cloud.google.com/looker-studio?hl=es) to power our email statistics dashboards. [Looker Studio](https://cloud.google.com/looker-studio?hl=es) is a modern BI & analytics platform used to tell stories with data.
To view your company's email statistics dashboard in Looker Studio, **users will need to be signed into a Google account**.
With this guide, you will learn how to integrate Google with Microsoft Entra ID. After completing these steps, users will be able to sign-in to Email Meter with Google using their existing Microsoft SSO.
To follow this guide, you will need administrator permissions on both Microsoft and Google admin panels.
## Requirements
To get started, you will need:
* A Microsoft 365 subscription
* A Google Workspace tenant
If you don't have a Google Workspace tenant, you can contact us to help you set one up. Alternatively, we can offer a Google Workspace tenant managed by Email Meter to set up your SSO.
## Instructions
### Create a SAML profile in Google Workspace
* Open a new tab in your browser, and sign in to the [Google Admin](https://admin.google.com).
* On the left sidebar, go to `Security > Authentication > SSO with third party IdP`.
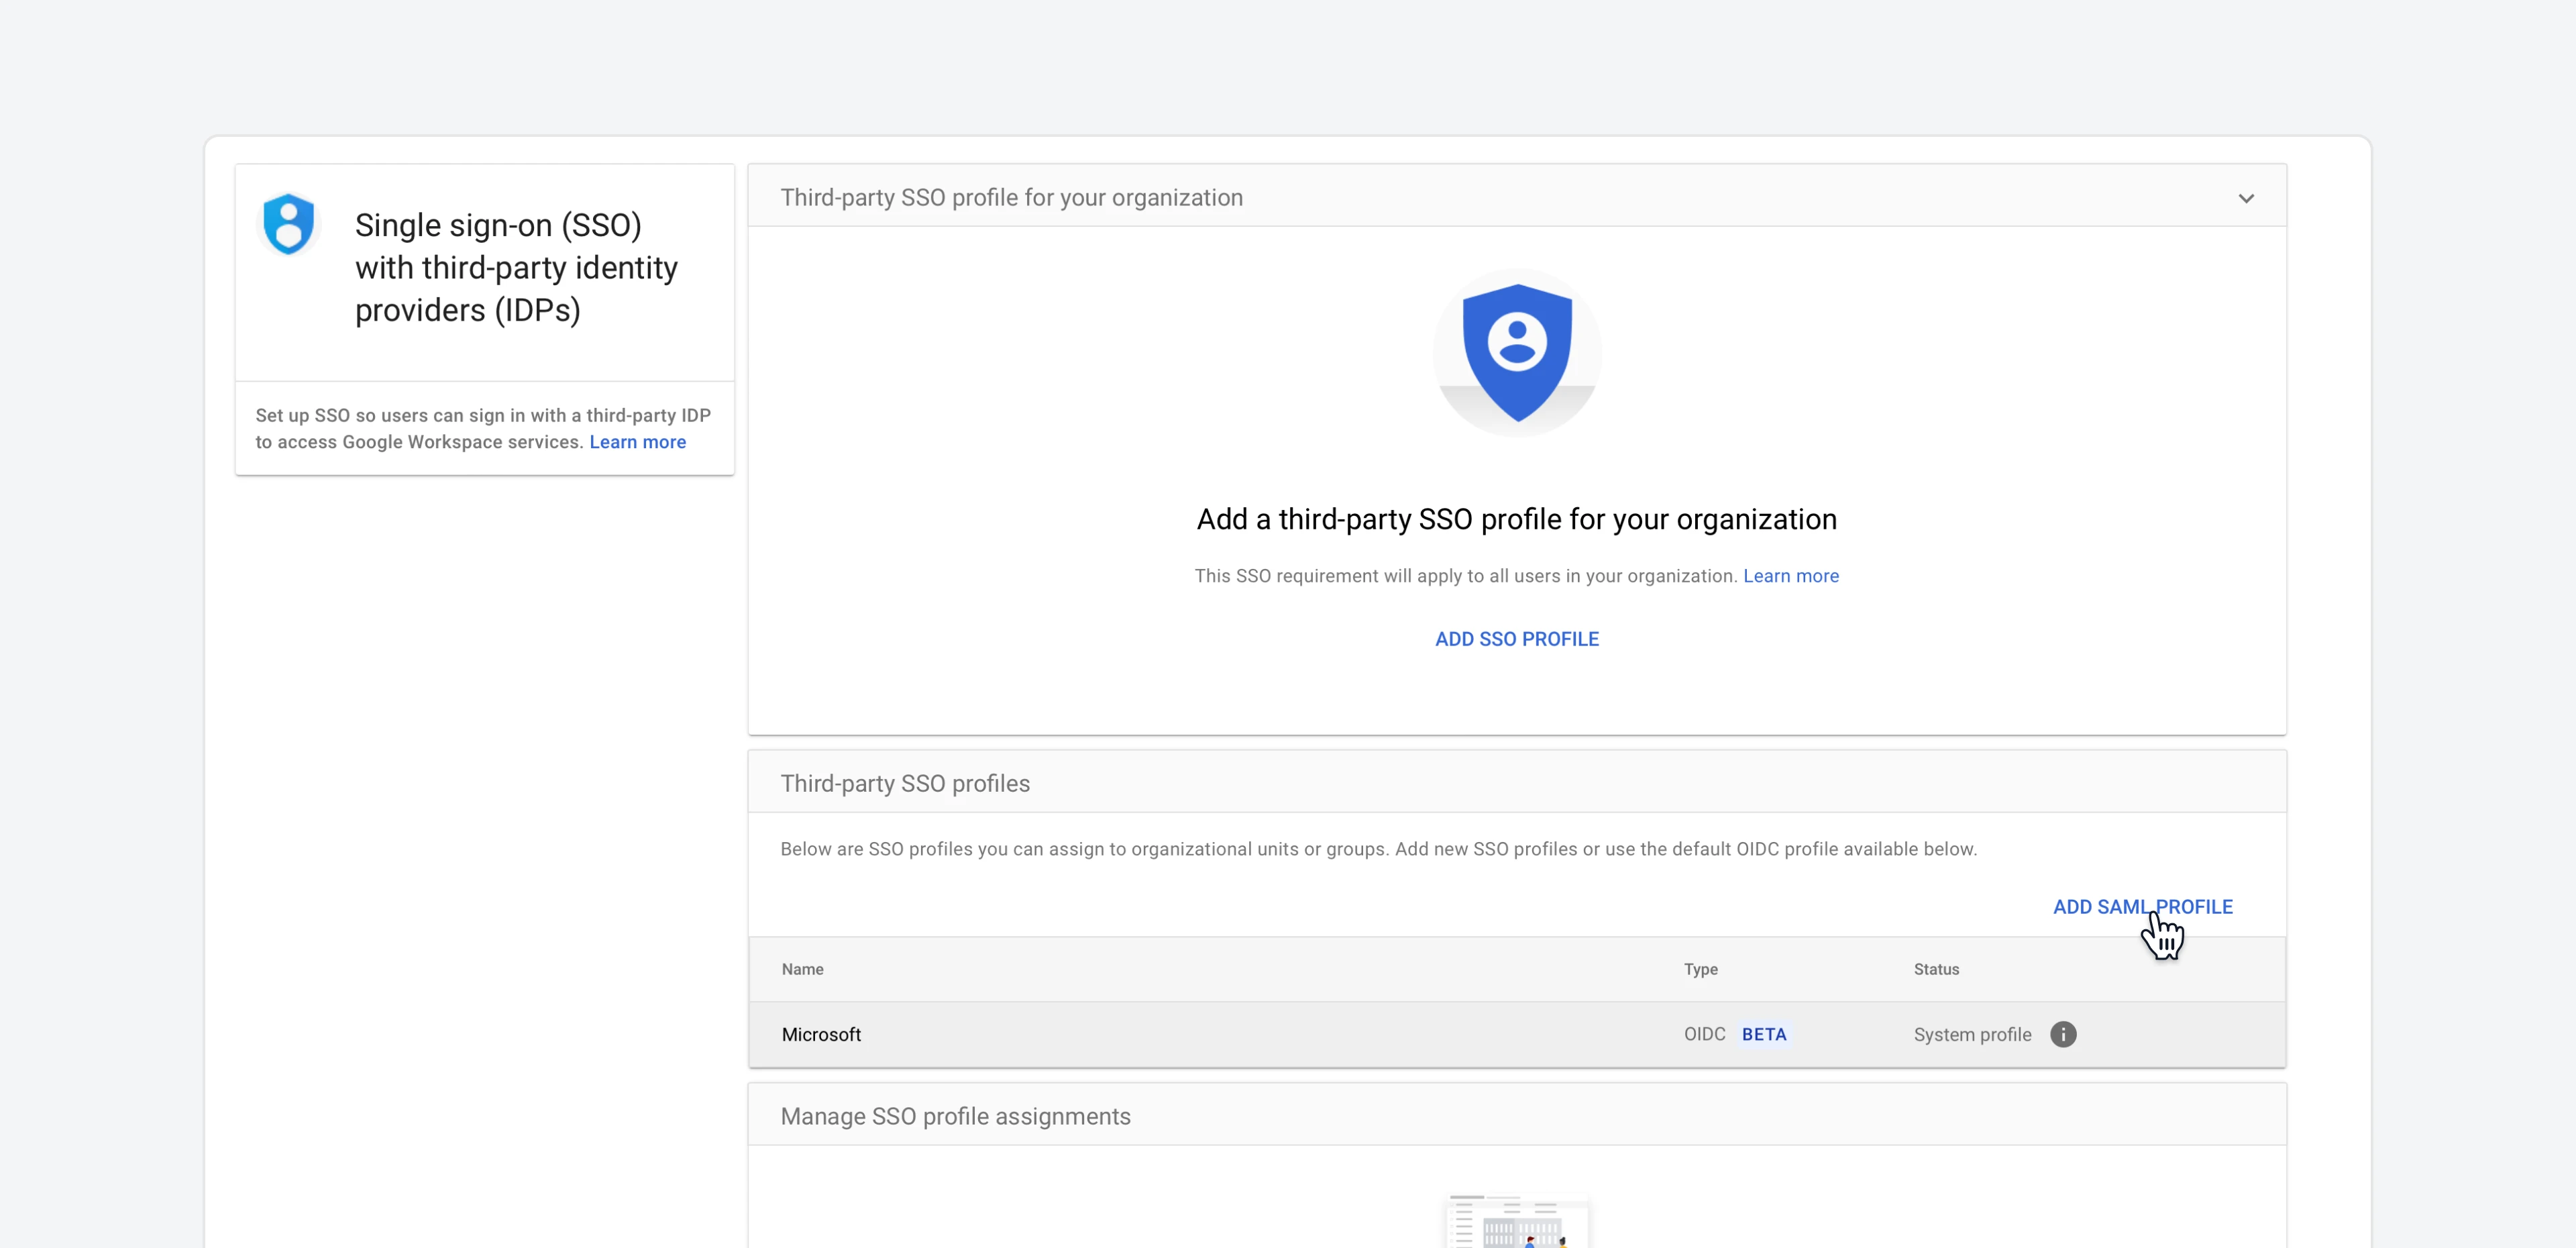
 * On the `Third-party SSO profiles` section, click on `Add SAML profile`.
 * A modal will open. There, you will need to input some information.
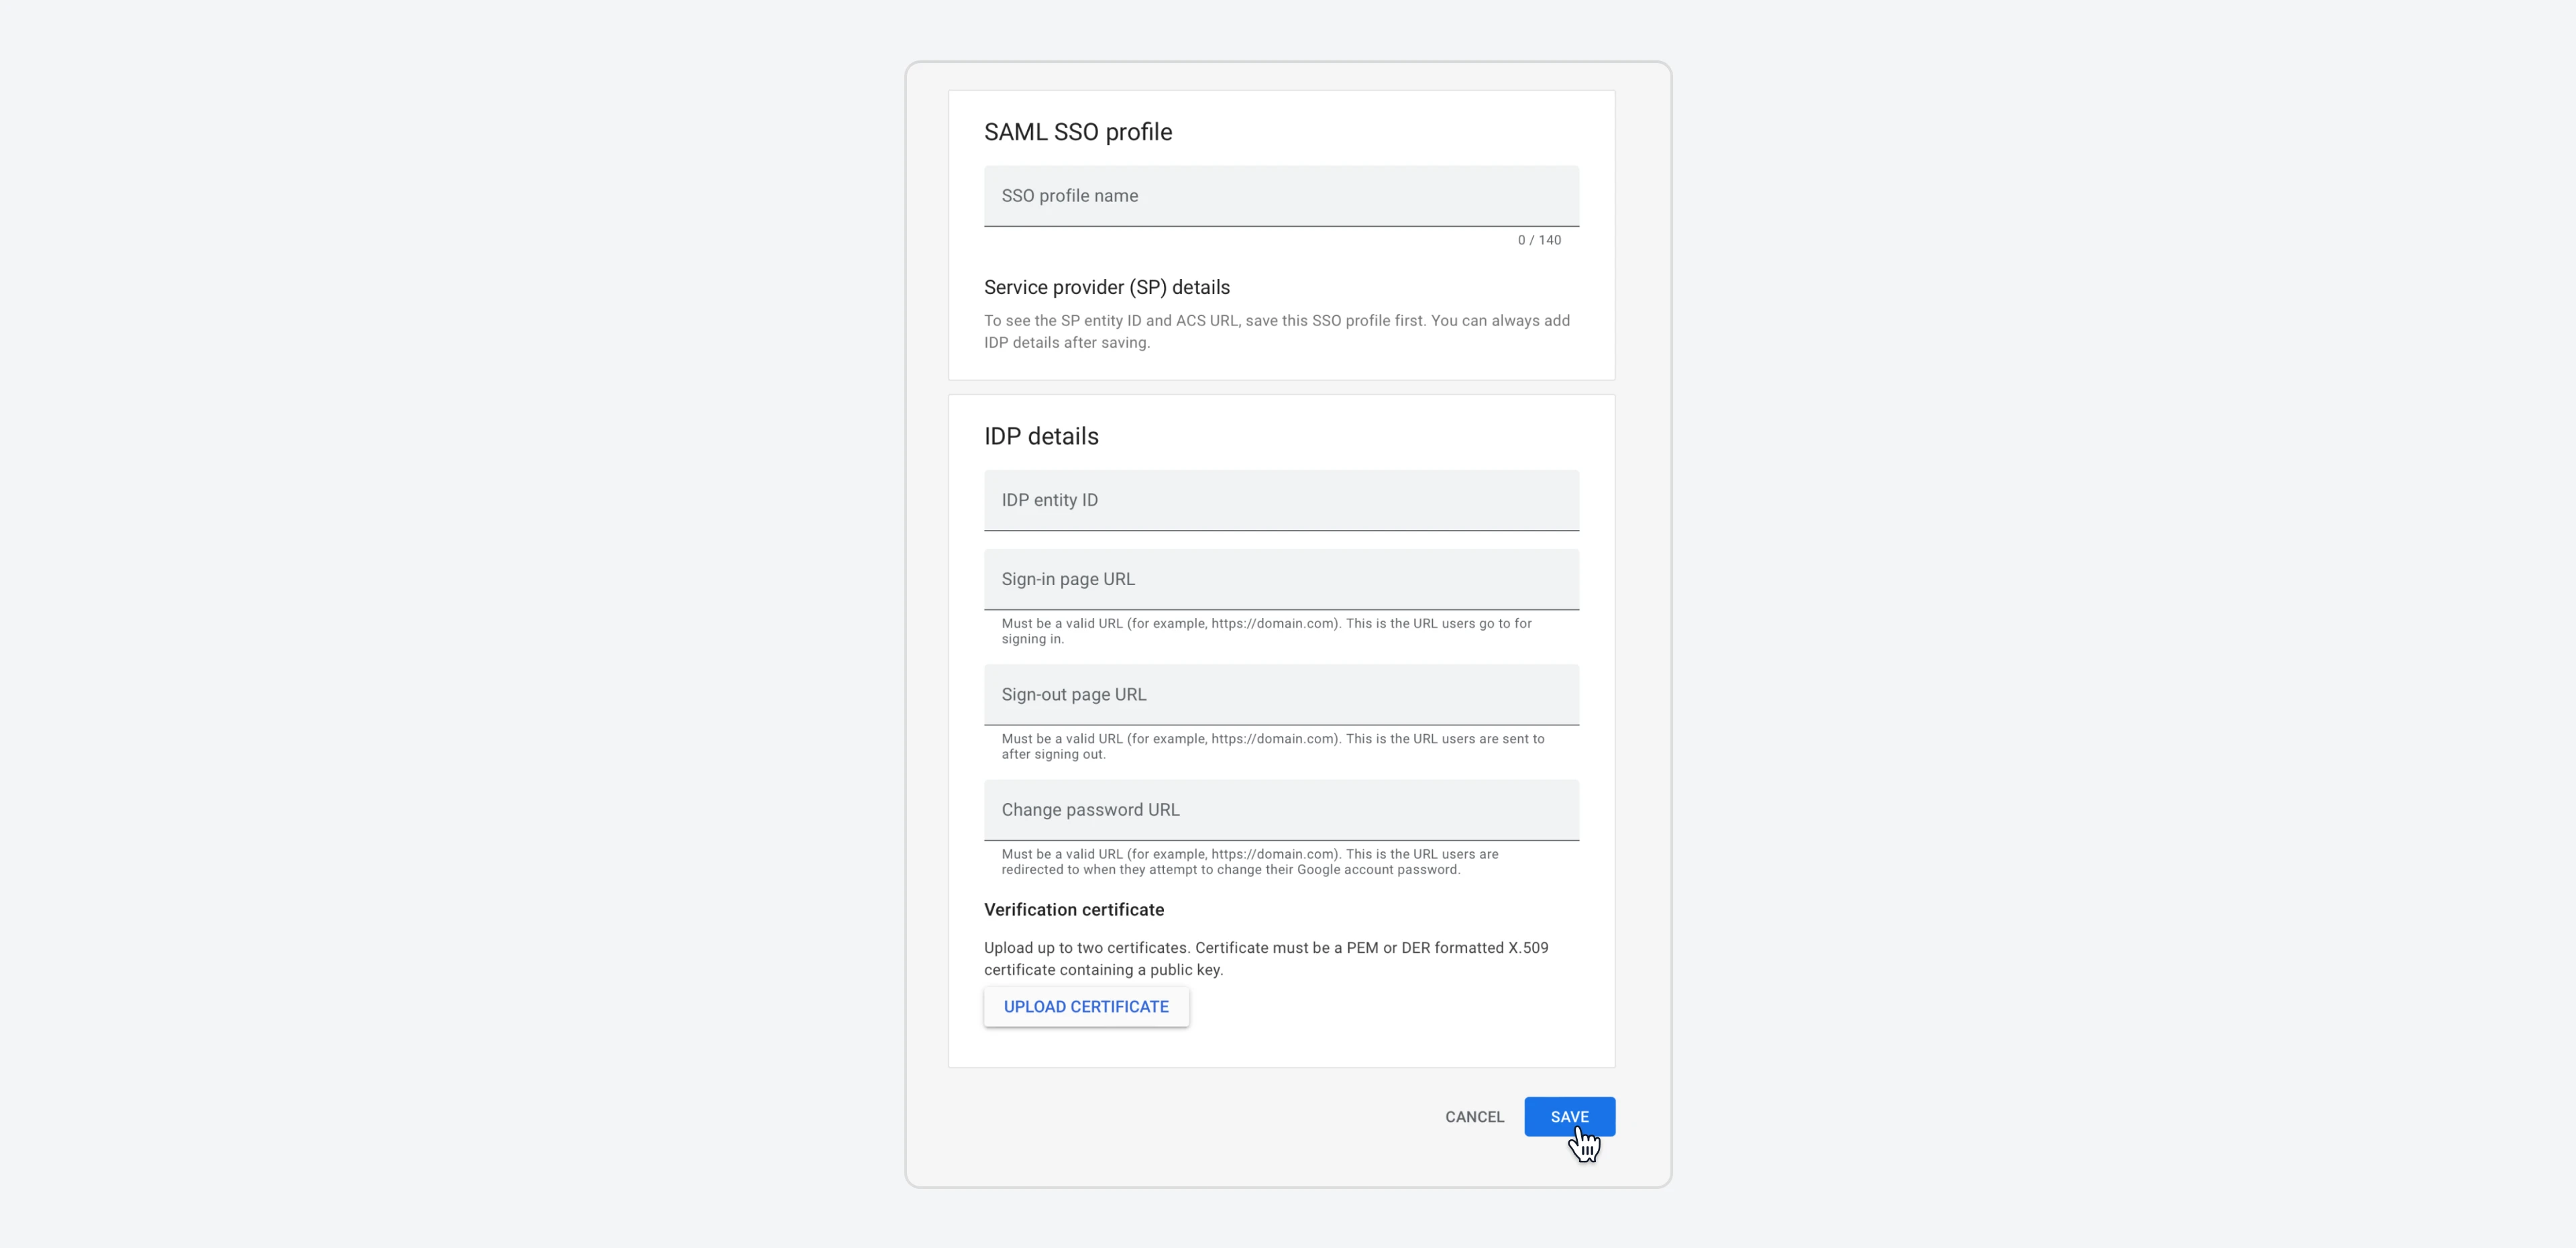 * `SSO profile name`: type `Microsoft SSO - SAML`, or any naming of your choice.
* `IDP entity ID`: leave blank.
* `Sign-in page URL`: leave blank.
* `Sign-out page URL`: leave blank.
* `Change password URL`: leave blank.
* Don't update a verification certificate yet.
* Once everything is filled, click `Save`.
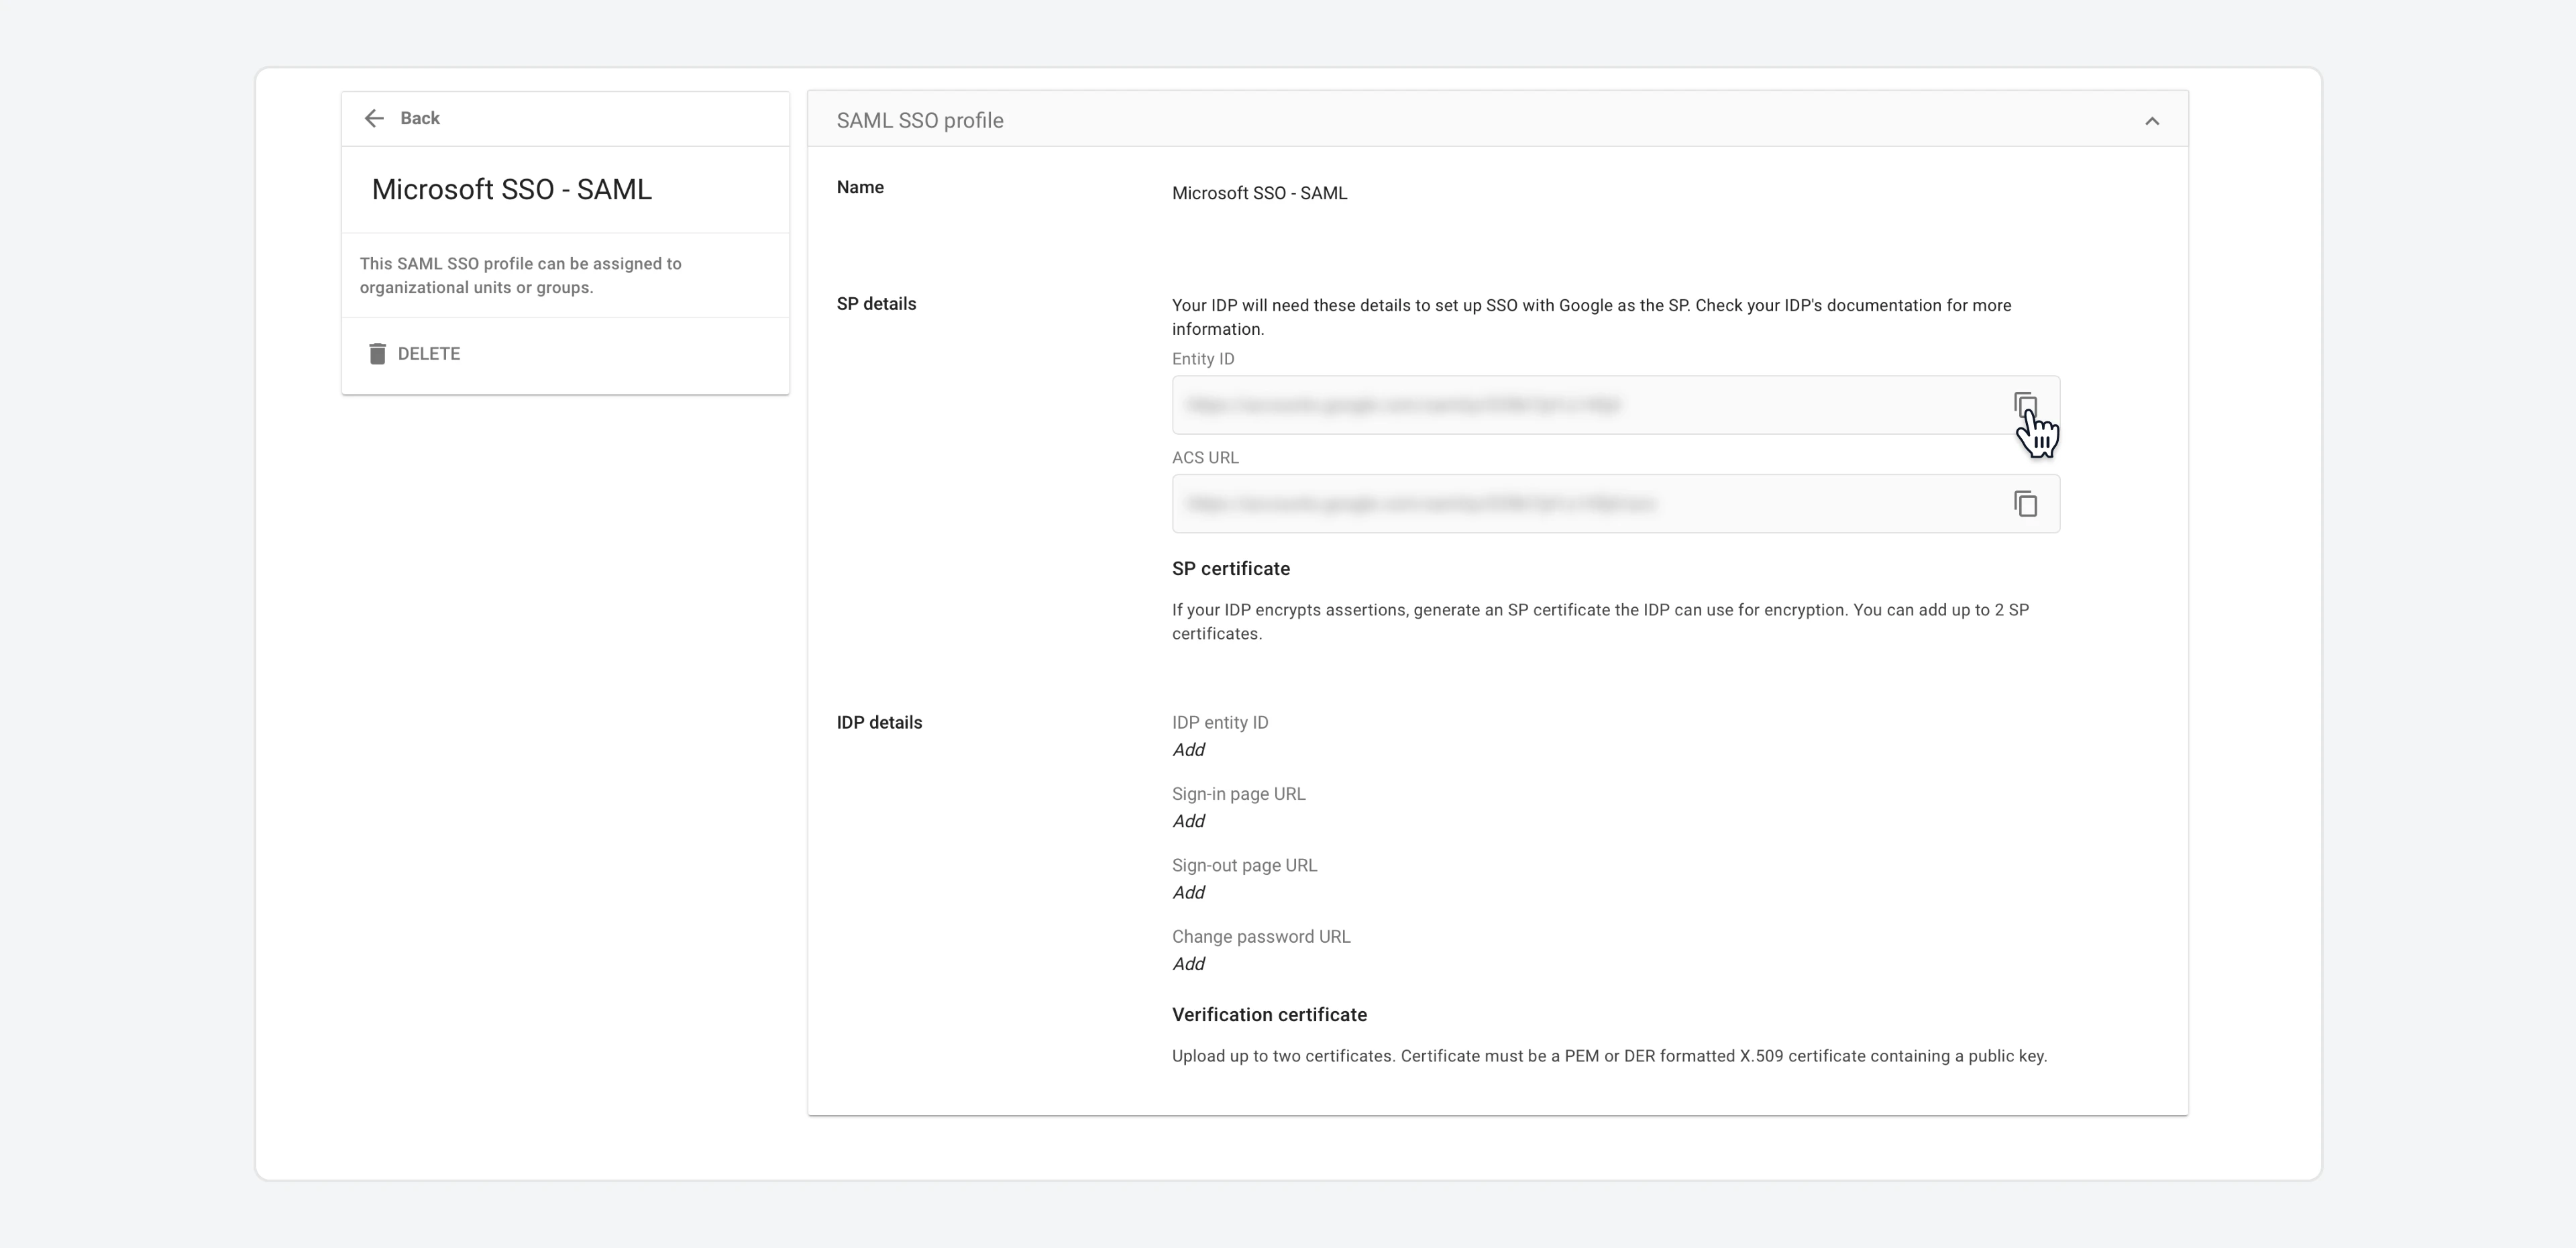
* The `SAML SSO profile` page that appears contains two URLs (`Entity ID` and `ACS URL`). Save these URLs, as you will need them in the next section when you configure Microsoft Entra ID.
* `SSO profile name`: type `Microsoft SSO - SAML`, or any naming of your choice.
* `IDP entity ID`: leave blank.
* `Sign-in page URL`: leave blank.
* `Sign-out page URL`: leave blank.
* `Change password URL`: leave blank.
* Don't update a verification certificate yet.
* Once everything is filled, click `Save`.
* The `SAML SSO profile` page that appears contains two URLs (`Entity ID` and `ACS URL`). Save these URLs, as you will need them in the next section when you configure Microsoft Entra ID.
 ### Install the Google Cloud connector in Microsoft Entra ID
* Sign in to the [Microsoft Entra admin center](https://entra.microsoft.com/).
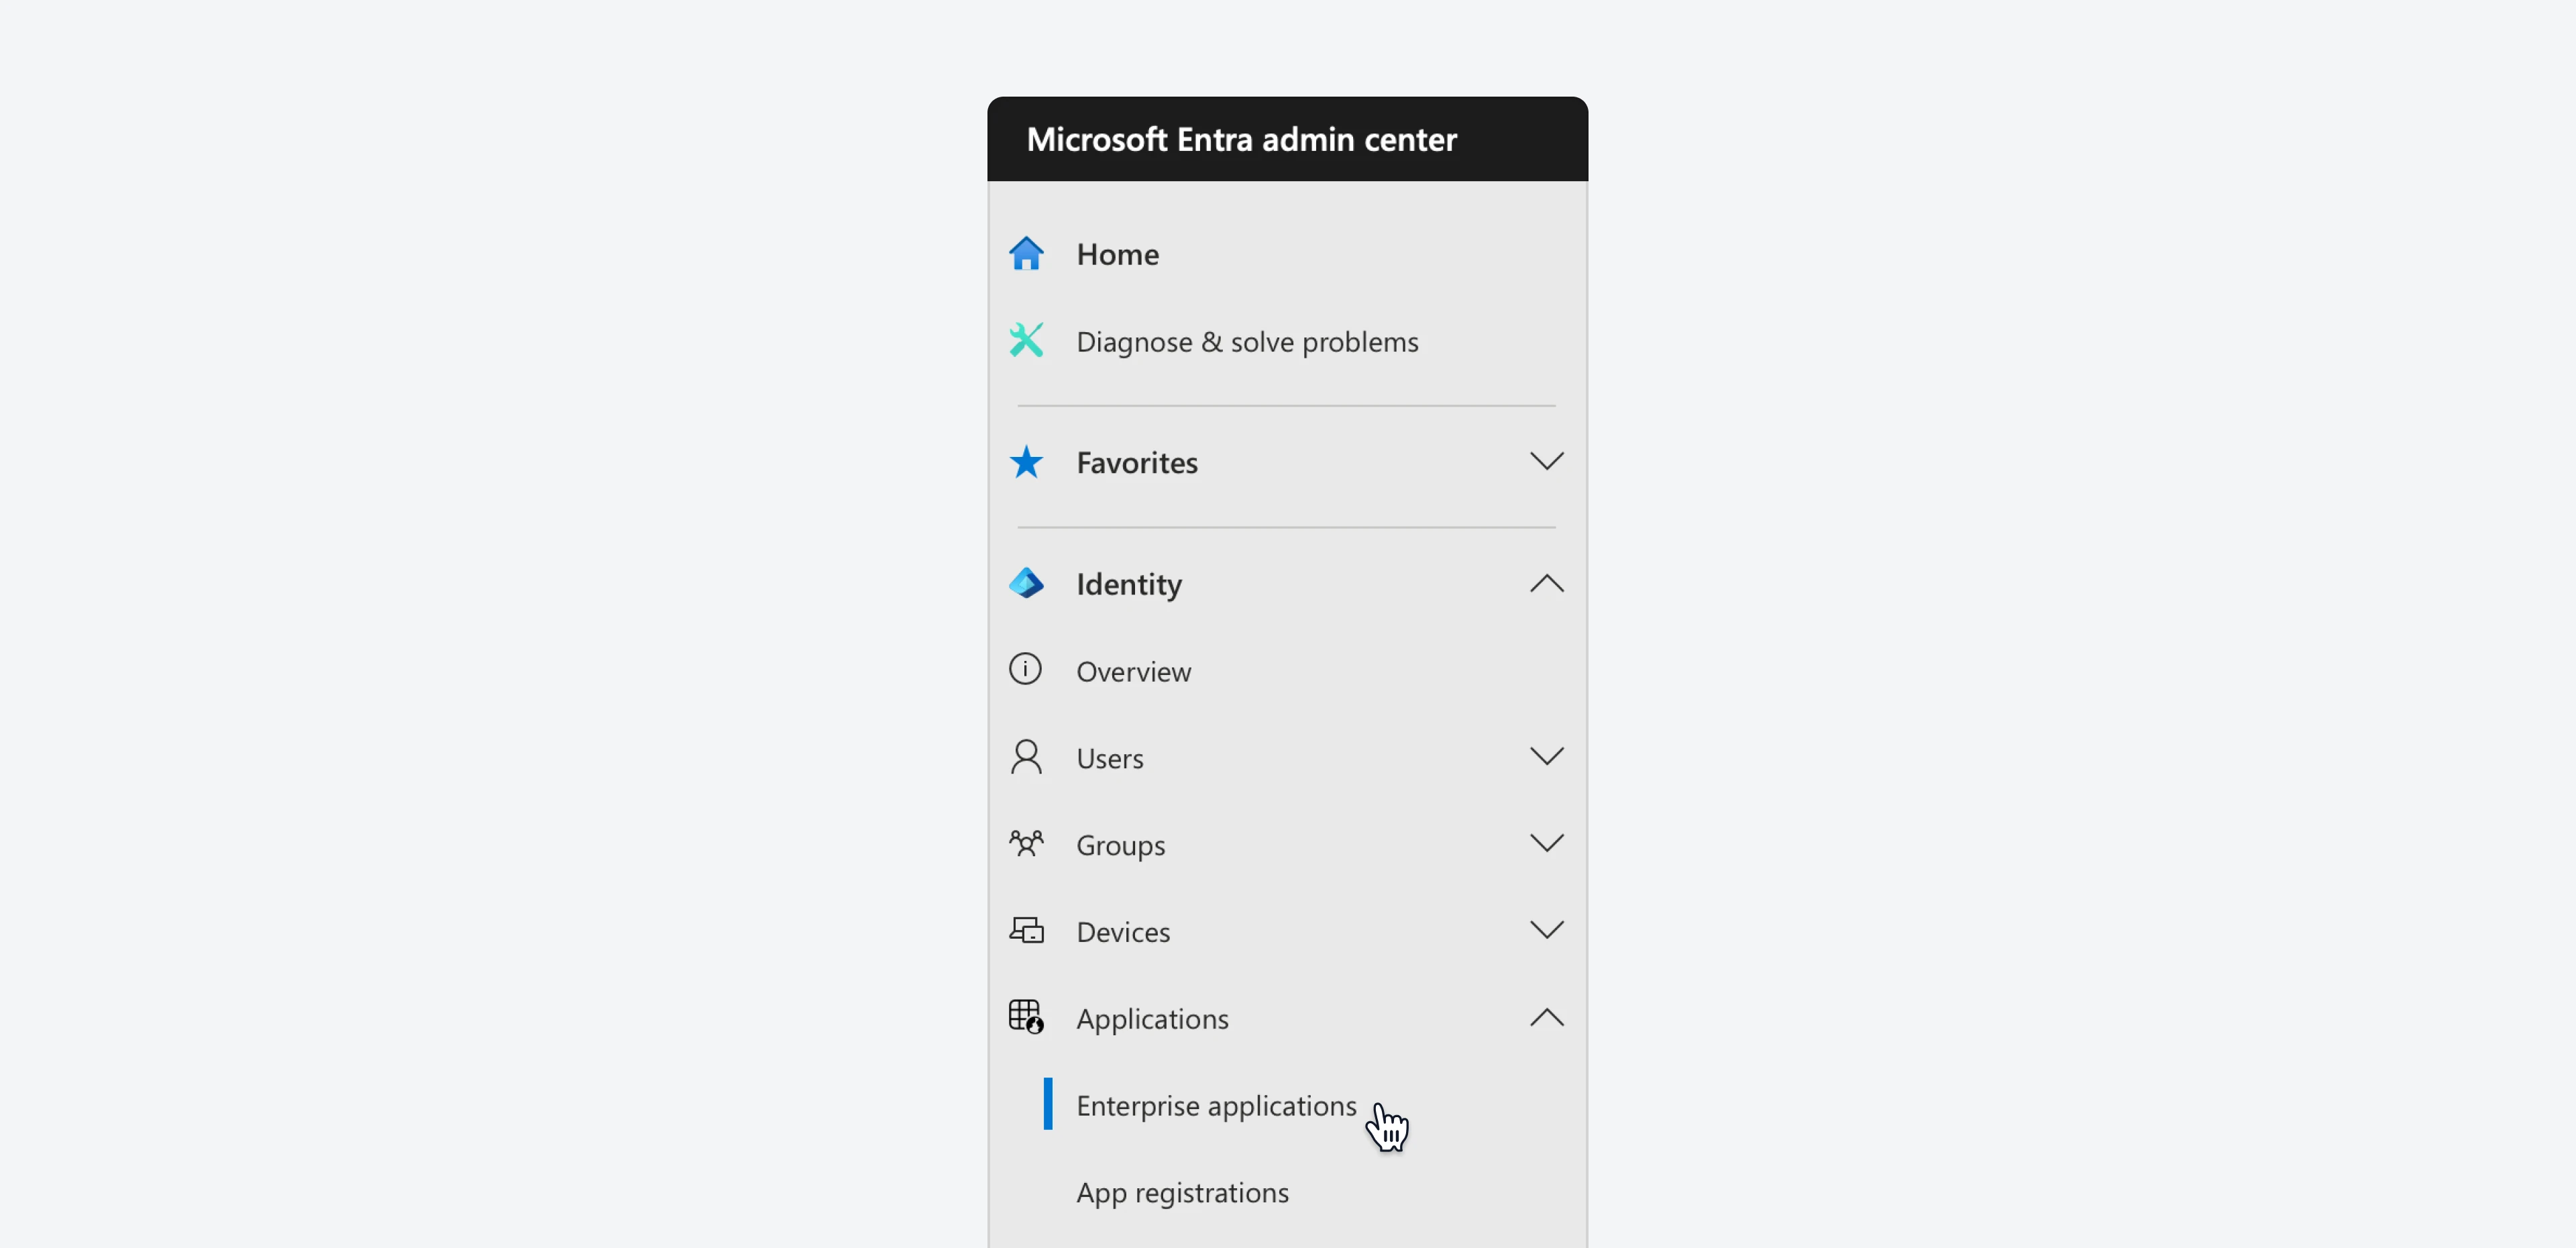
* Go to `Identity > Applications > Enterprise applications` and then click on `New application`.
### Install the Google Cloud connector in Microsoft Entra ID
* Sign in to the [Microsoft Entra admin center](https://entra.microsoft.com/).
* Go to `Identity > Applications > Enterprise applications` and then click on `New application`.
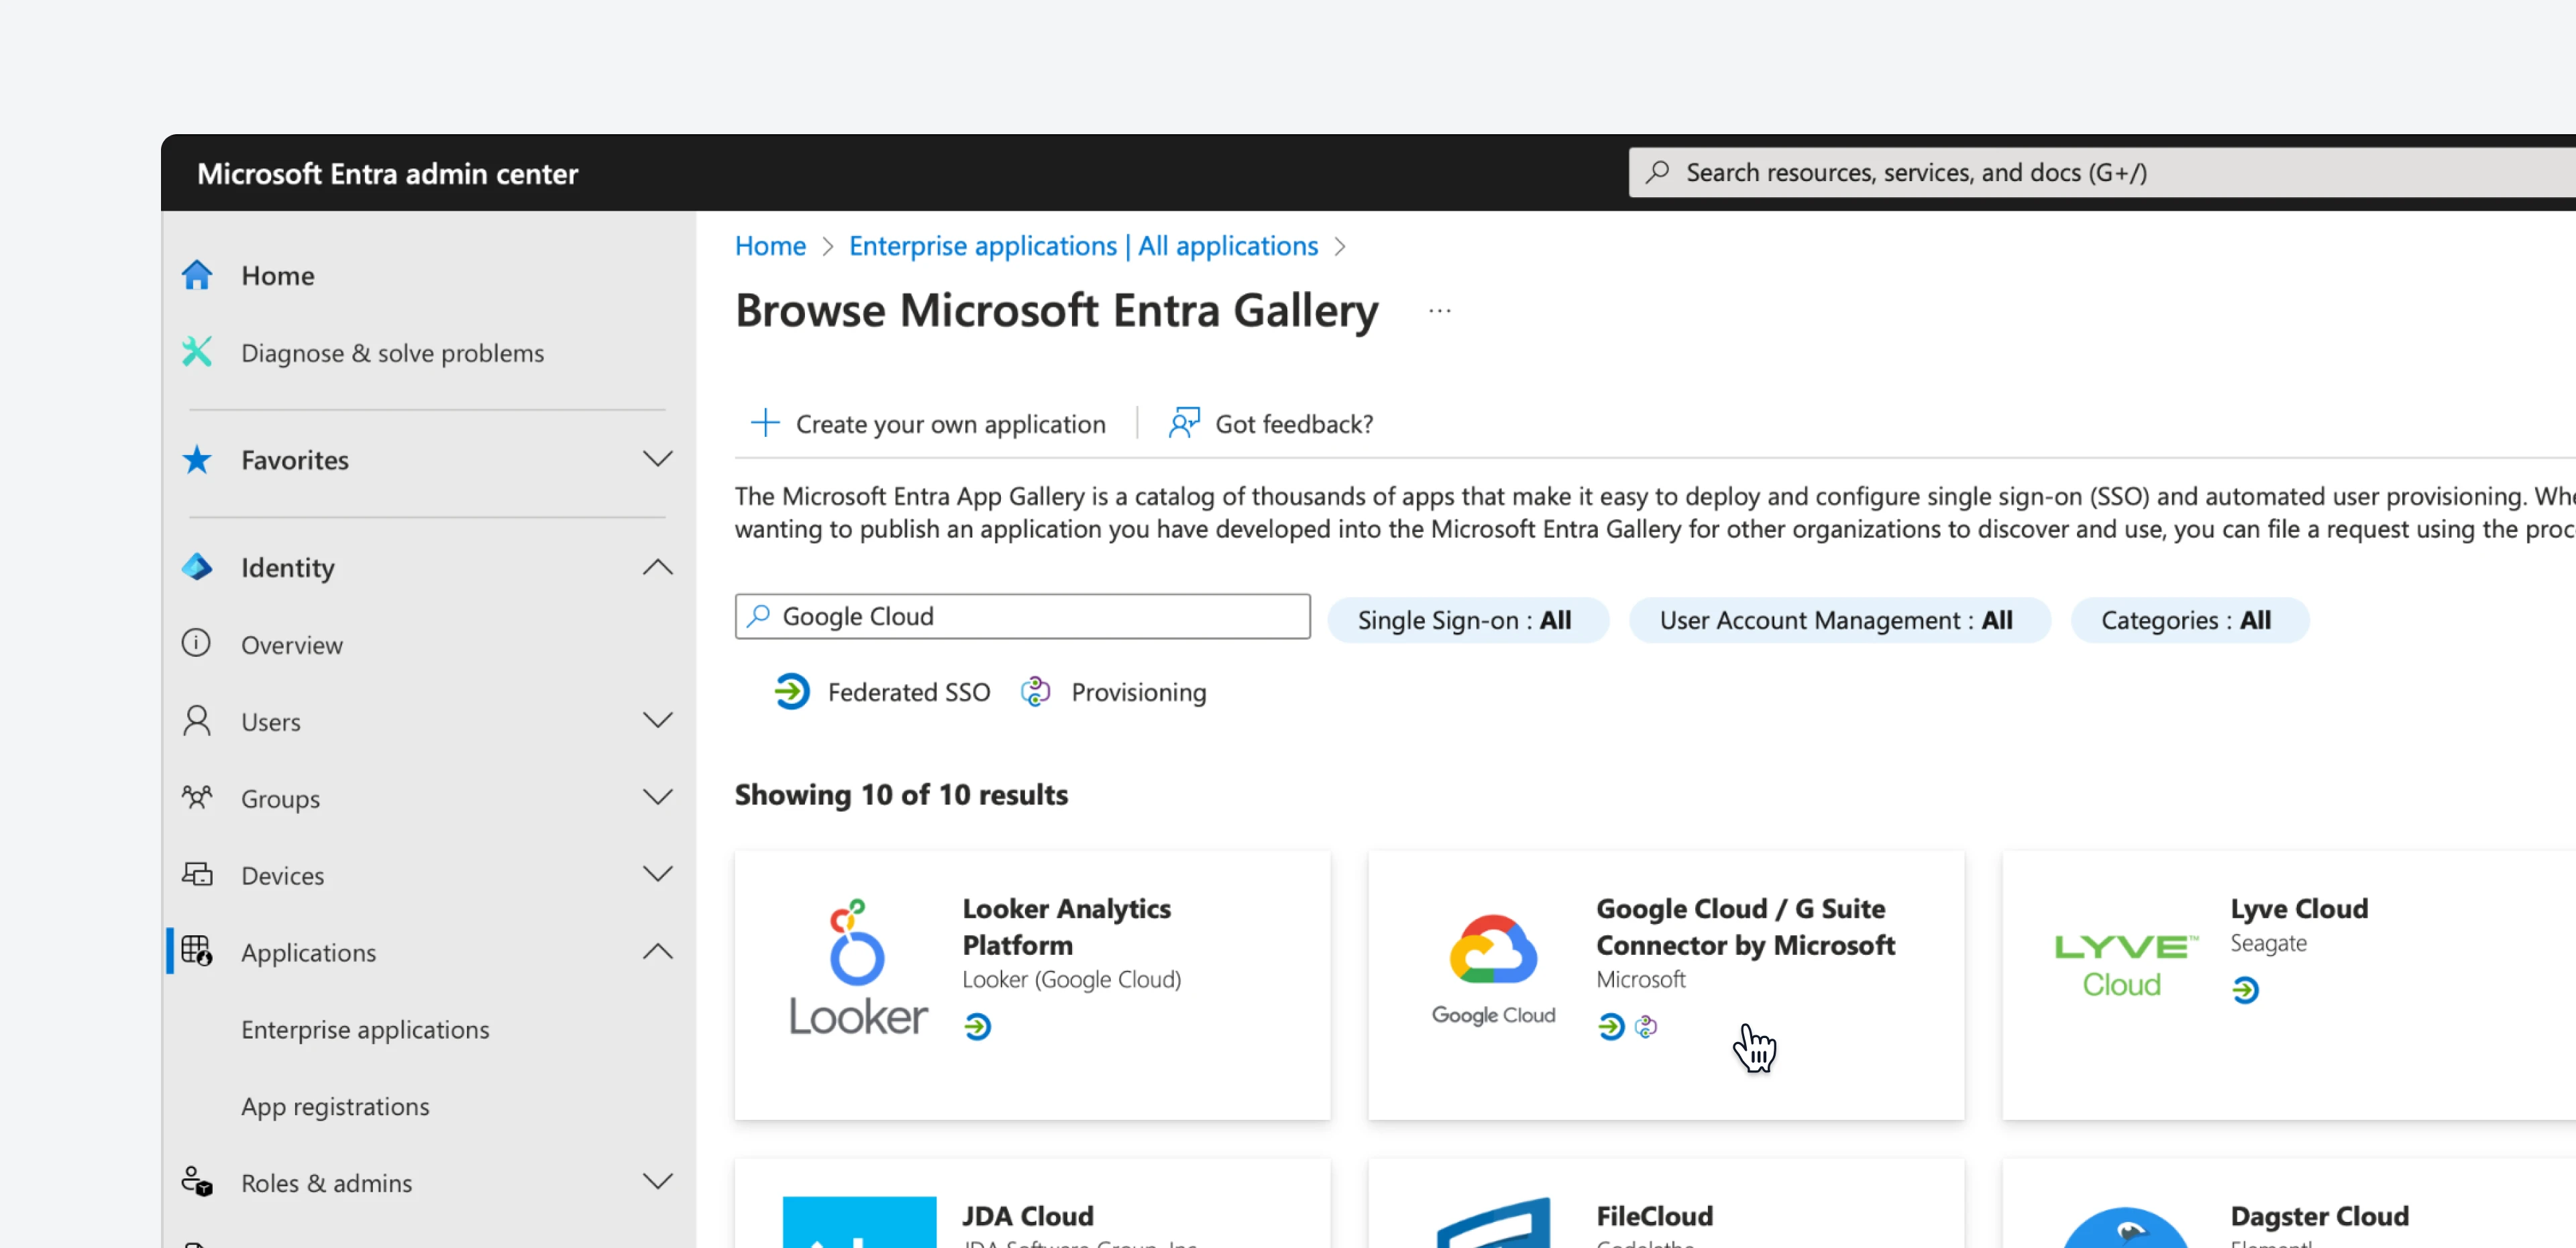
 * In the search bar, type "Google Cloud".
* Select `Google Cloud / G Suite Connector by Microsoft` from the results. A drawer menu will appear on the left. Now, click on the `Create` button to add the application.
* In the search bar, type "Google Cloud".
* Select `Google Cloud / G Suite Connector by Microsoft` from the results. A drawer menu will appear on the left. Now, click on the `Create` button to add the application.
 * Wait a few seconds, and the application will be added to your tenant.
### Set up Microsoft Entra SSO
Now, you need to establish a relationship between your users in Microsoft Entra and the related user in Google Cloud.
* Sign in to the [Microsoft Entra admin center](https://entra.microsoft.com/).
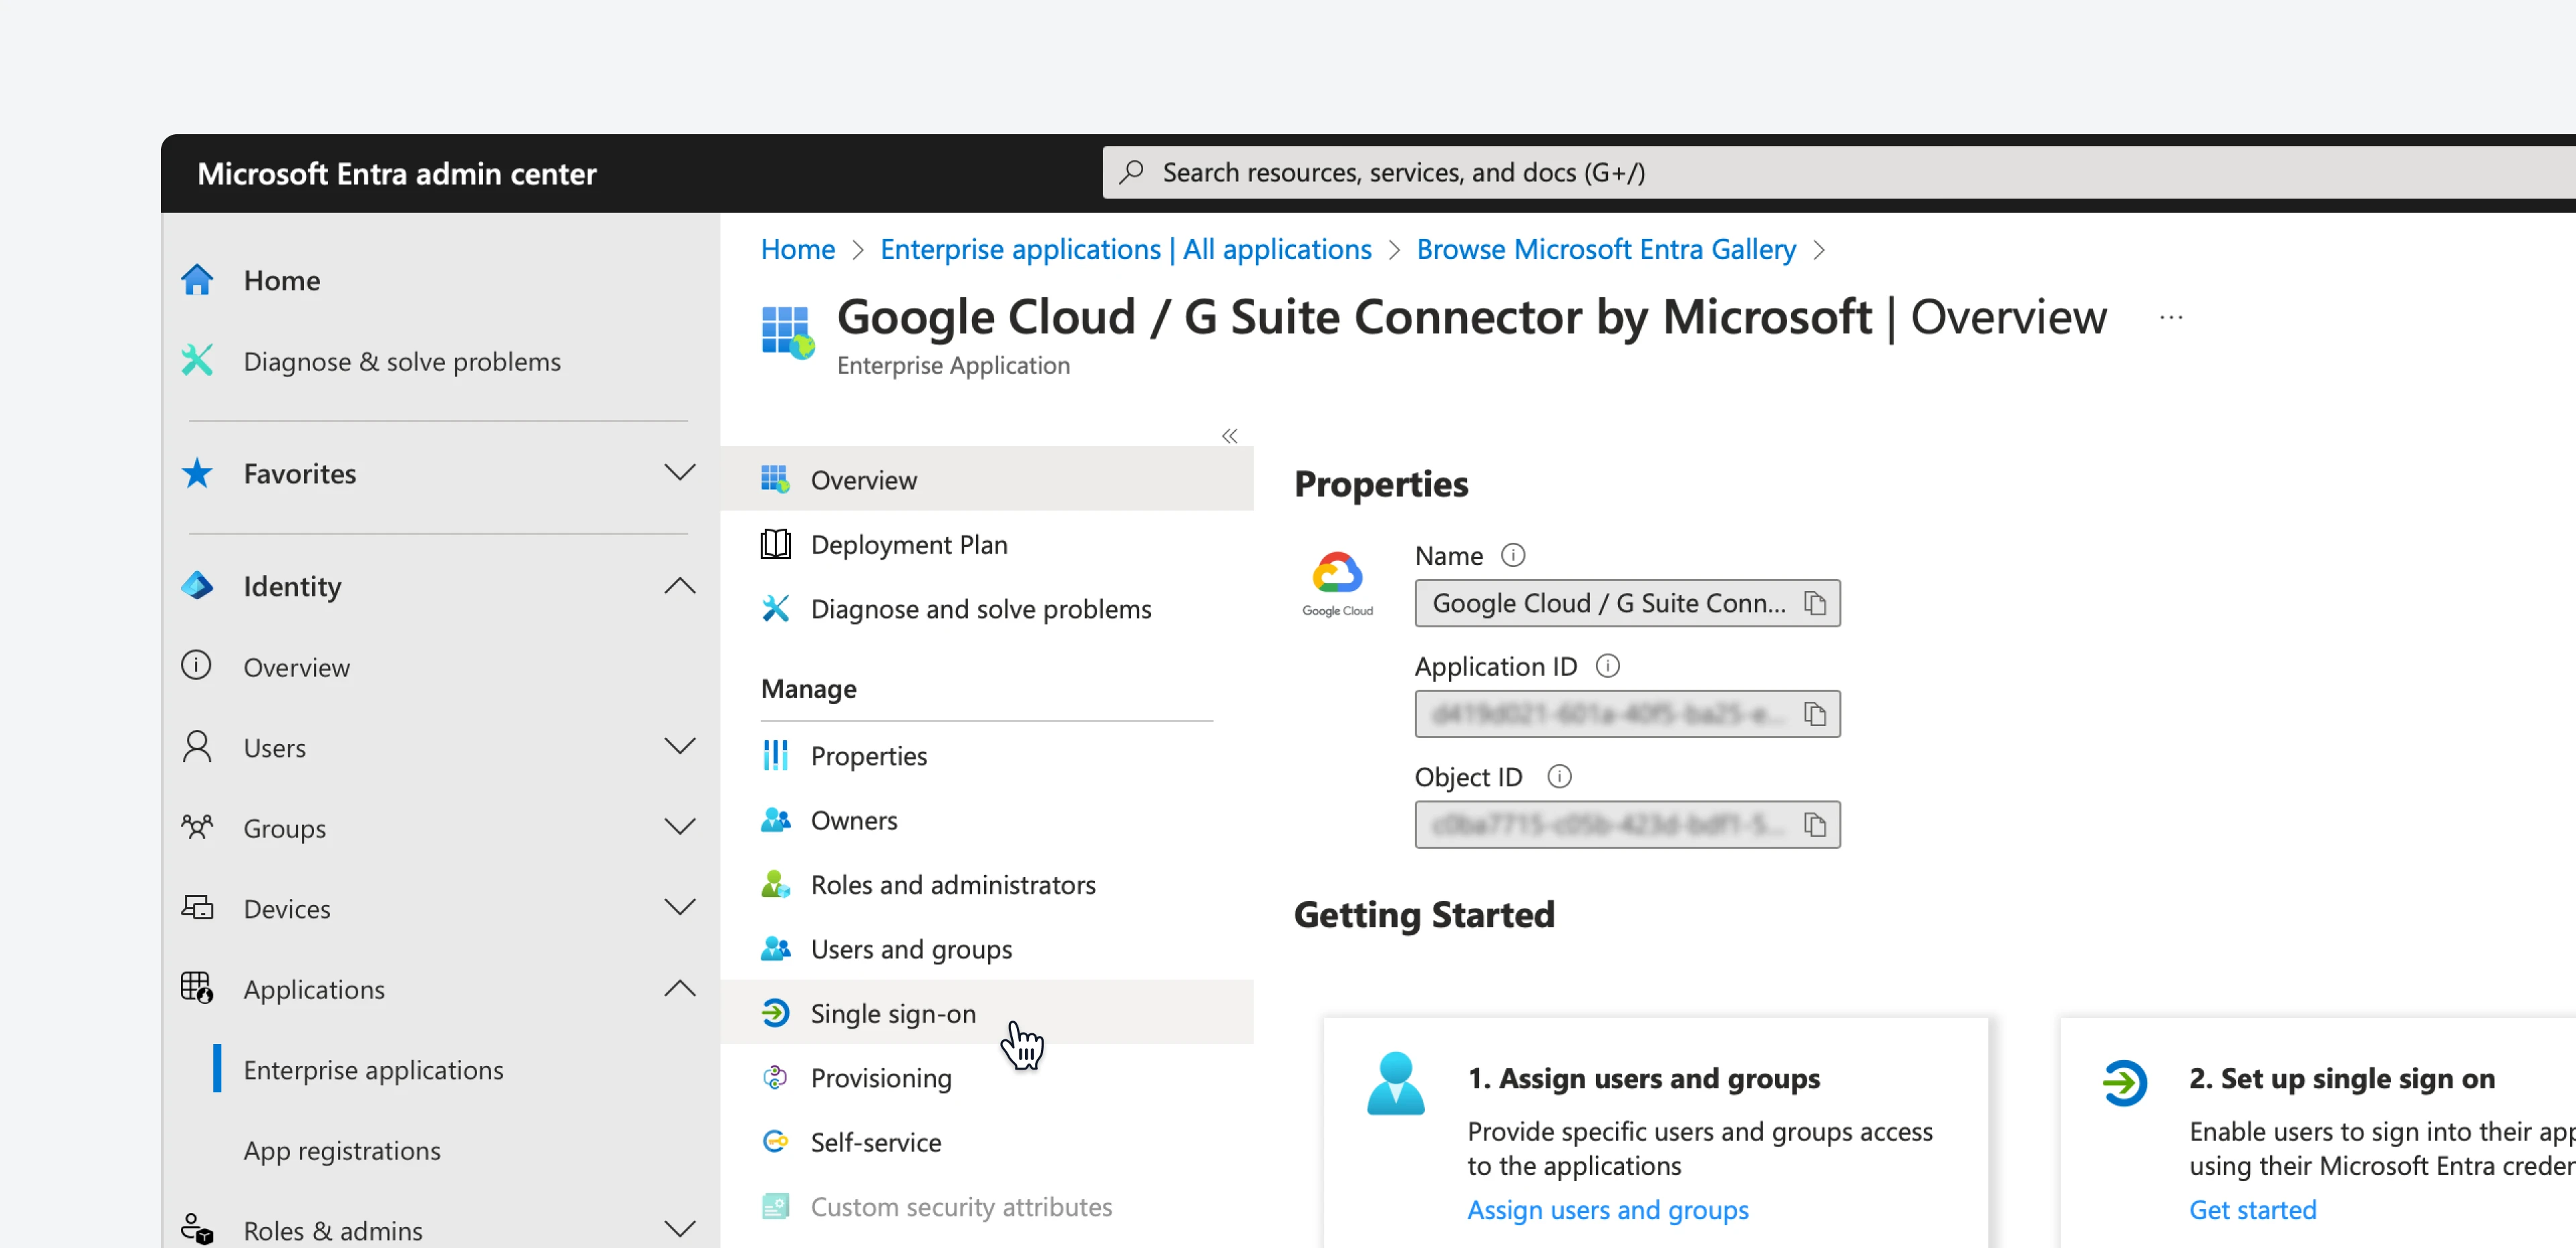
* Go to `Identity > Applications > Enterprise applications > Google Cloud / G Suite Connector by Microsoft`. There, go to the `Single-sign-on` section.
* Wait a few seconds, and the application will be added to your tenant.
### Set up Microsoft Entra SSO
Now, you need to establish a relationship between your users in Microsoft Entra and the related user in Google Cloud.
* Sign in to the [Microsoft Entra admin center](https://entra.microsoft.com/).
* Go to `Identity > Applications > Enterprise applications > Google Cloud / G Suite Connector by Microsoft`. There, go to the `Single-sign-on` section.
 * Select the `SAML` option.
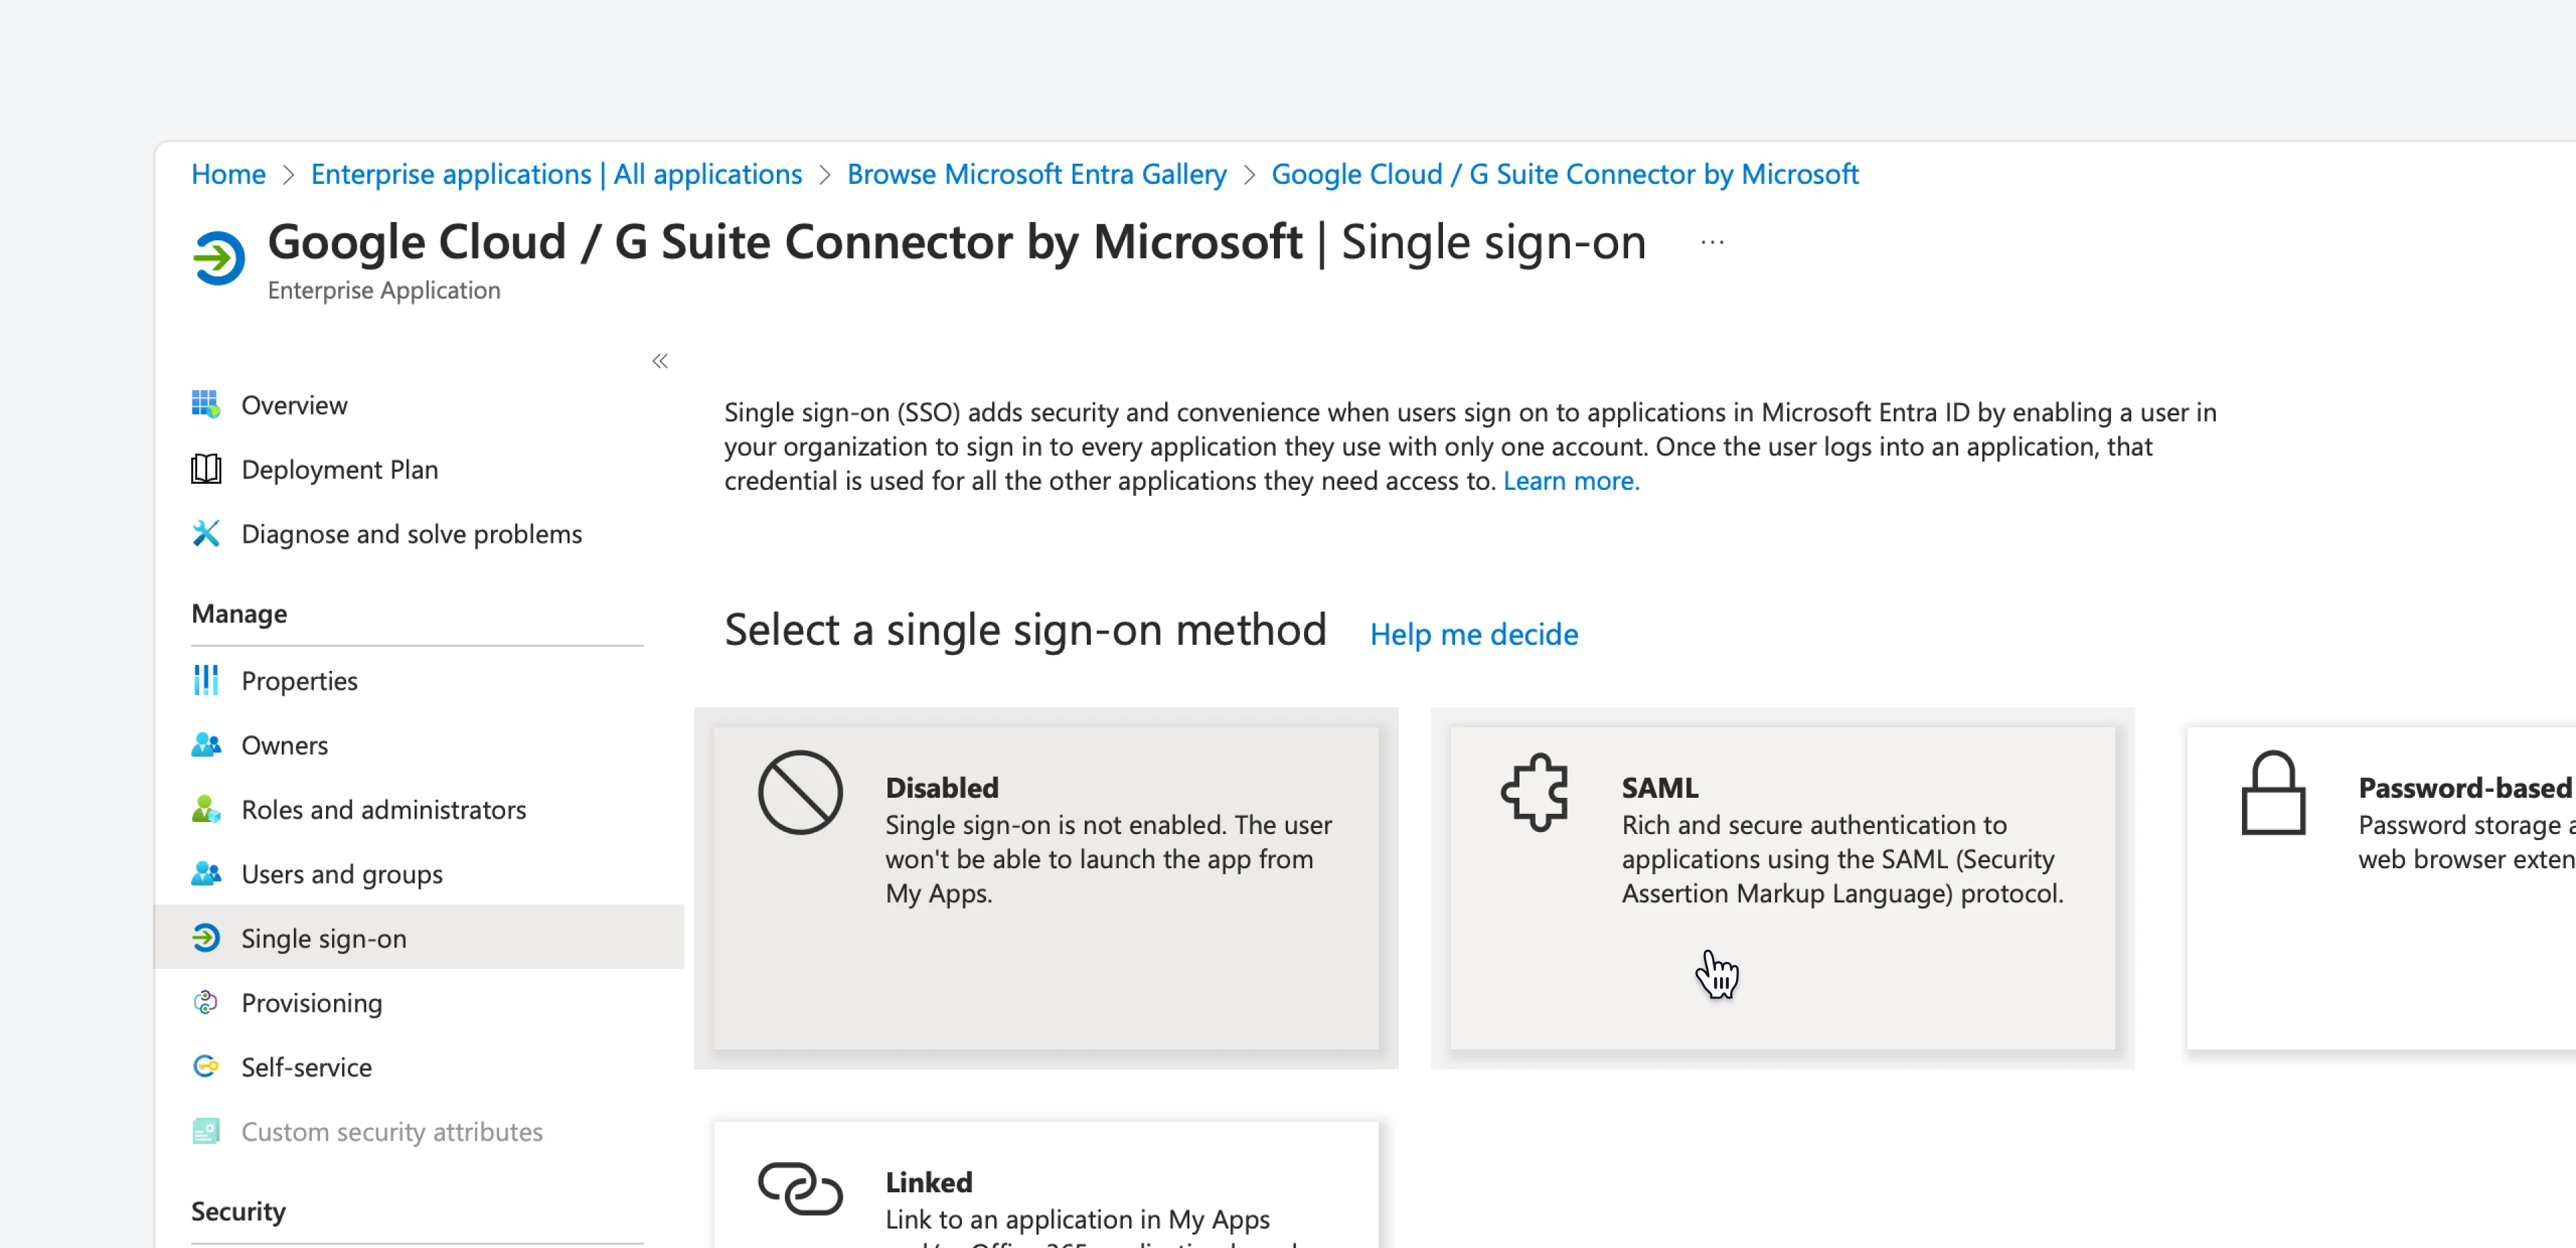 * On the `Basic SAML Configuration` section, click on the pencil icon to edit the settings.
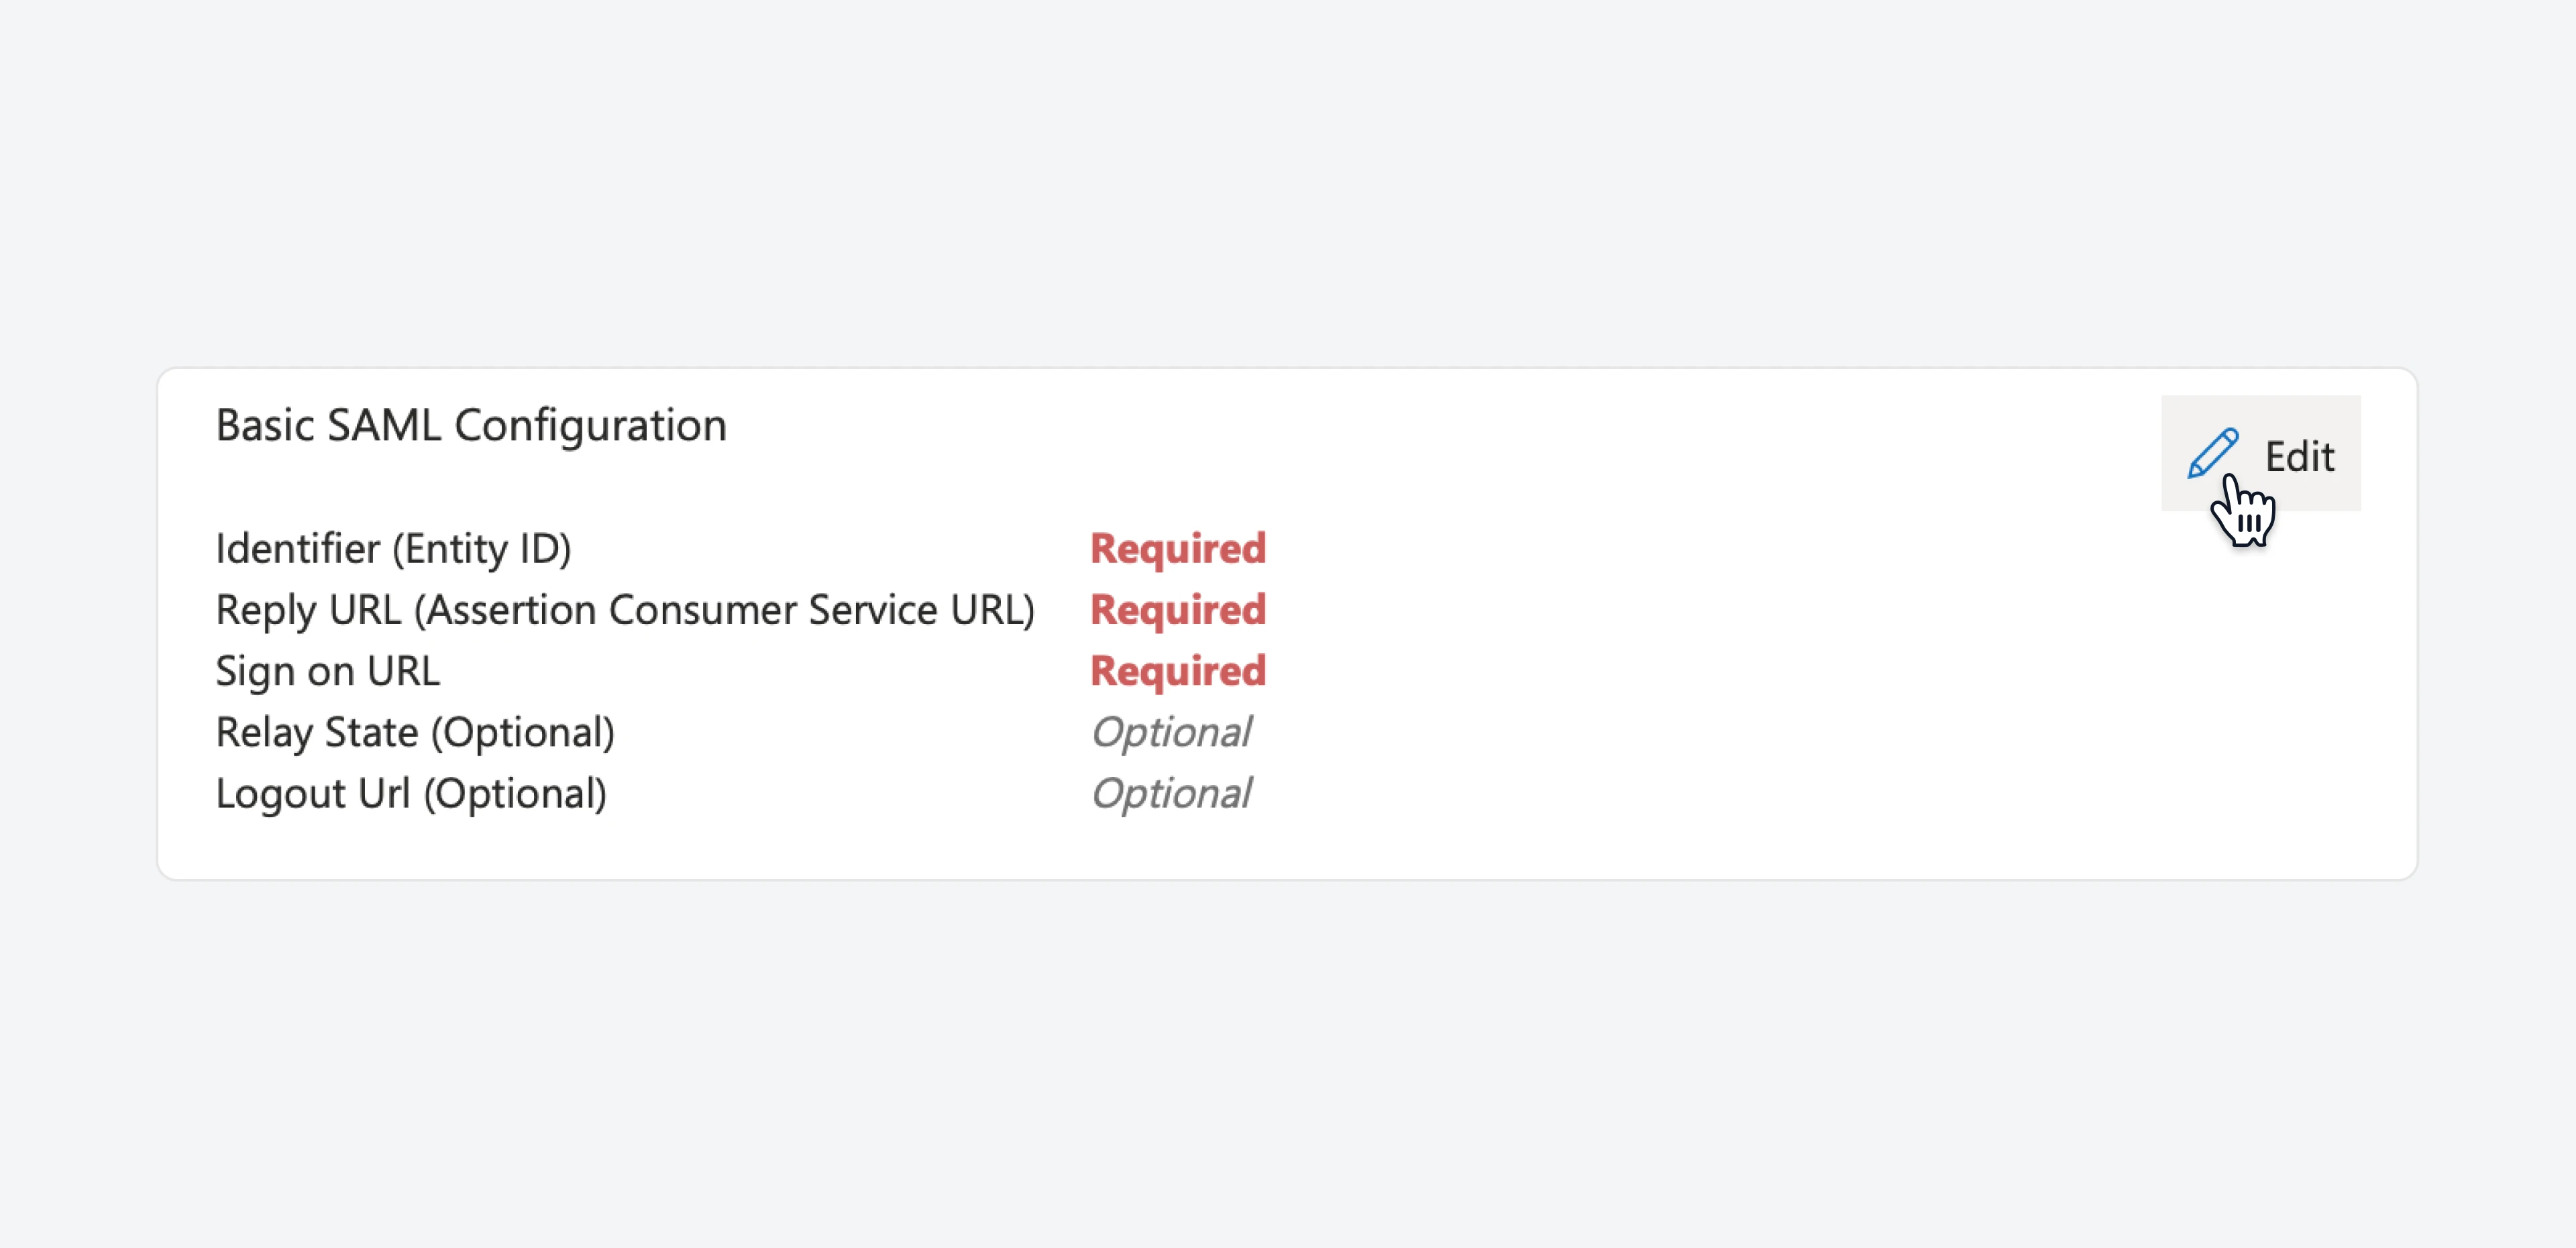 * In the `Identifier` textbox, paste the `Entity ID` that you saved previously from the Google admin, and set `Default` to `enabled`. Remove all other entries.
* In the `Reply URL` textbox, paste the `ACS URL` that you saved previously from the Google admin.
* In the `Sign on URL` textbox, paste the custom URL that the Email Meter team has provided to you. If you don't have it, please get in touch with your point of contact.
* Then, click `Save` to save your changes.
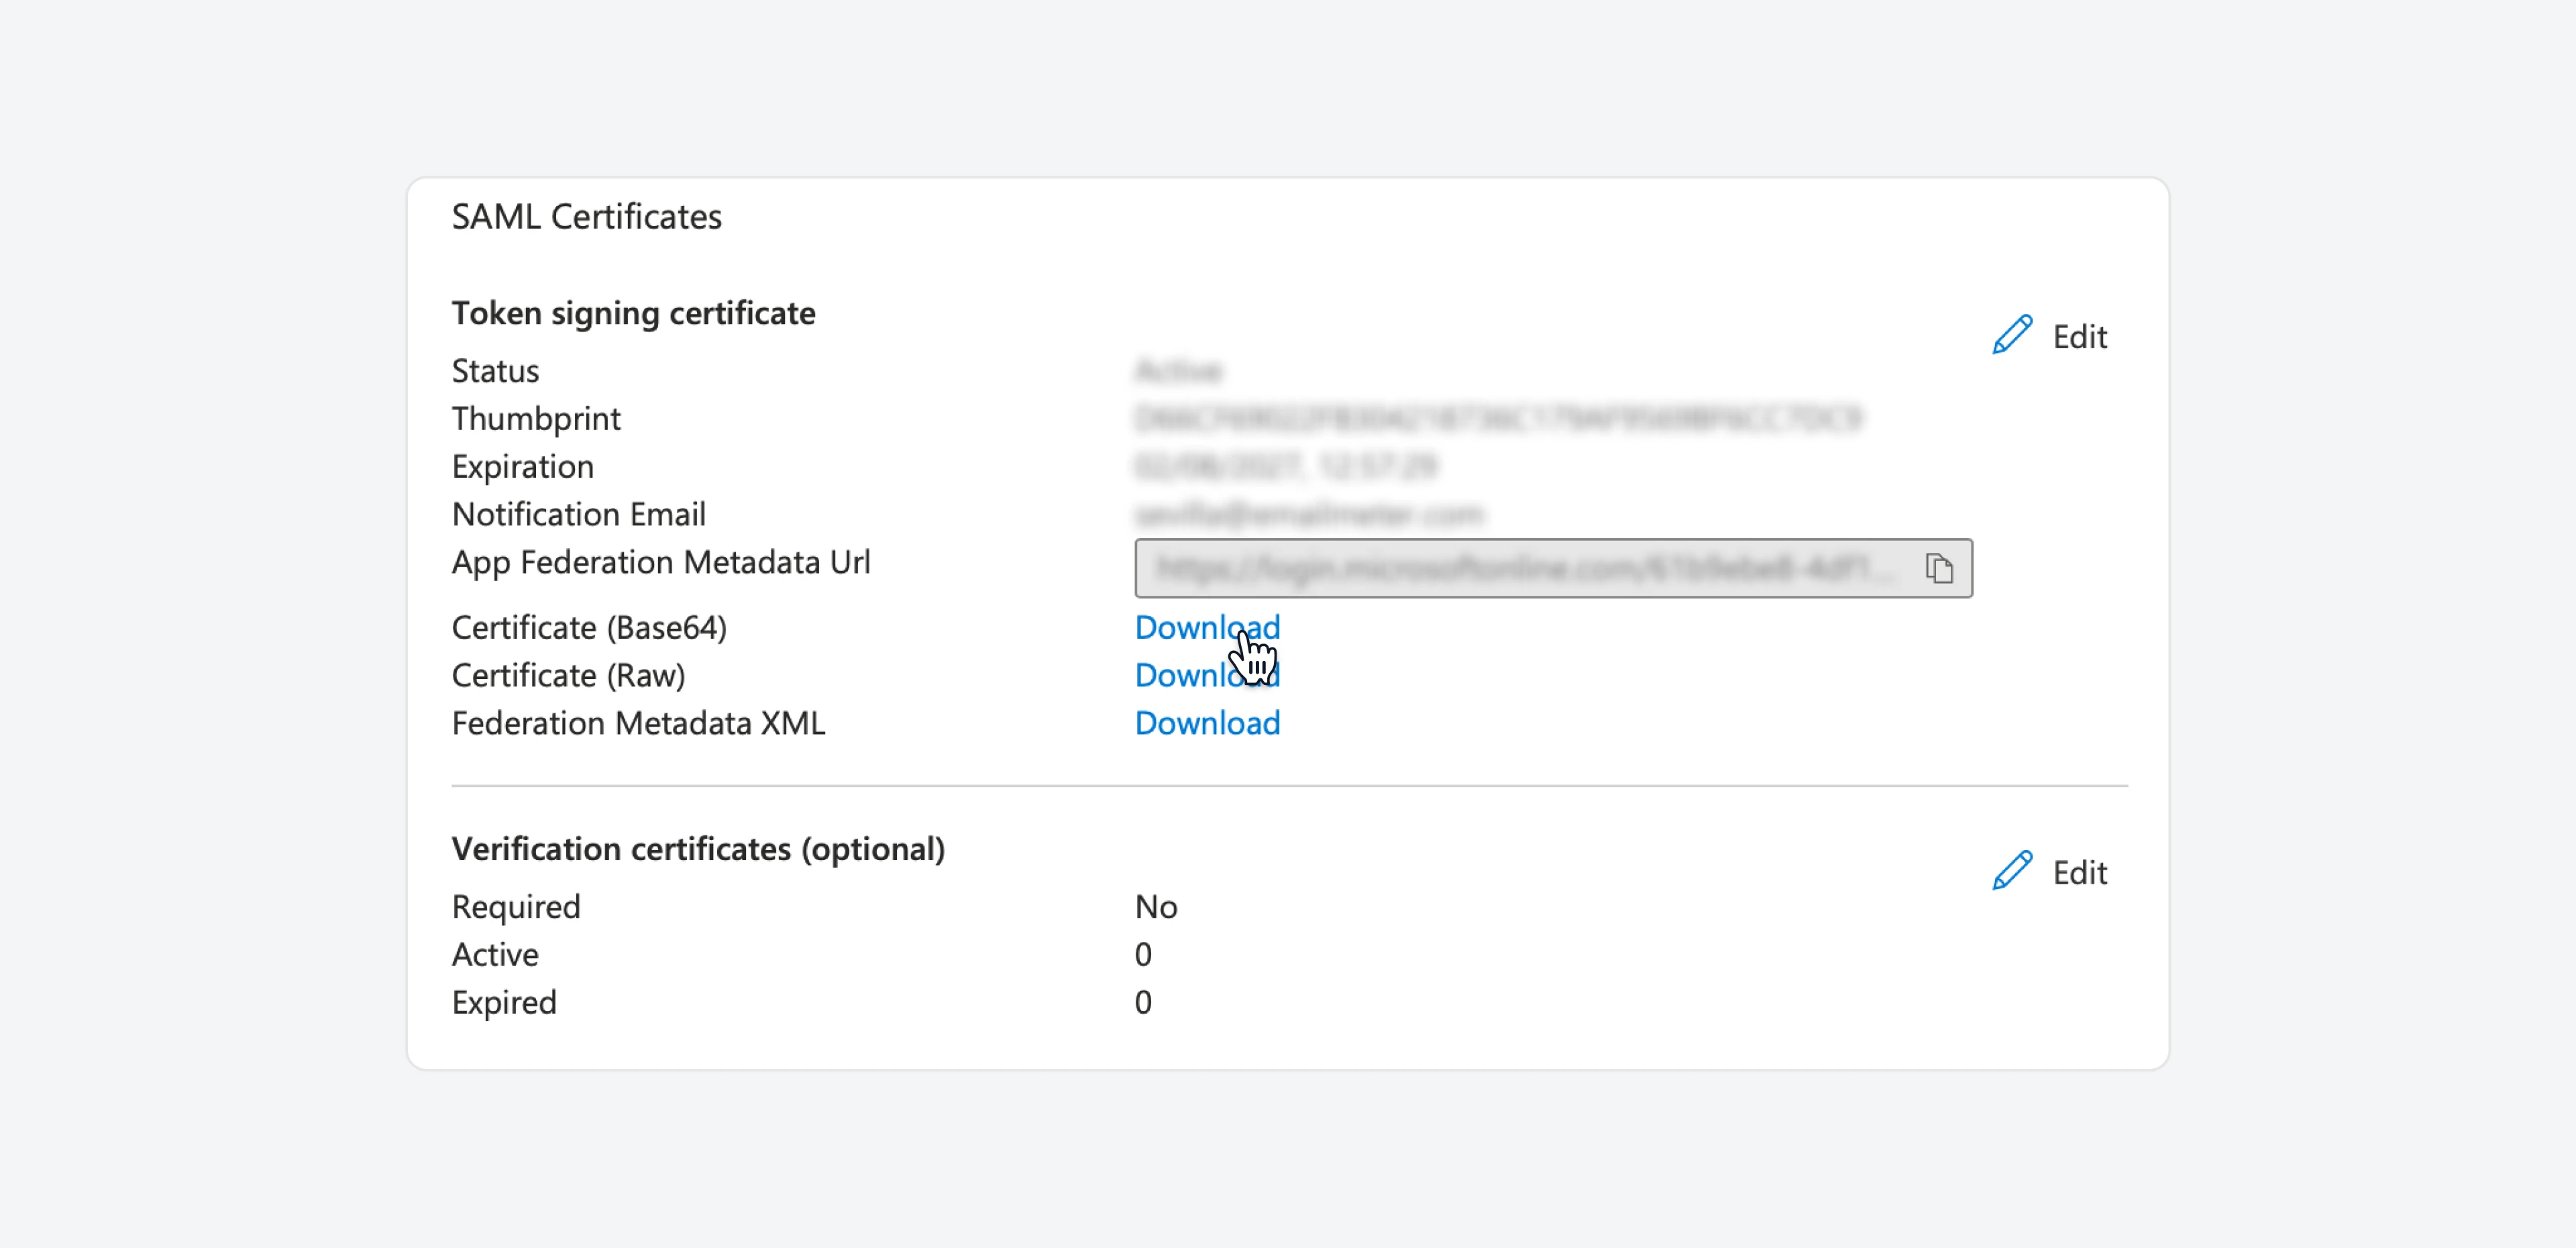
* On the `SAML Signing Certificate` section, find `Certificate (Base 64)` and click `Download` to download the certificate. You will need it shortly.
* In the `Identifier` textbox, paste the `Entity ID` that you saved previously from the Google admin, and set `Default` to `enabled`. Remove all other entries.
* In the `Reply URL` textbox, paste the `ACS URL` that you saved previously from the Google admin.
* In the `Sign on URL` textbox, paste the custom URL that the Email Meter team has provided to you. If you don't have it, please get in touch with your point of contact.
* Then, click `Save` to save your changes.
* On the `SAML Signing Certificate` section, find `Certificate (Base 64)` and click `Download` to download the certificate. You will need it shortly.
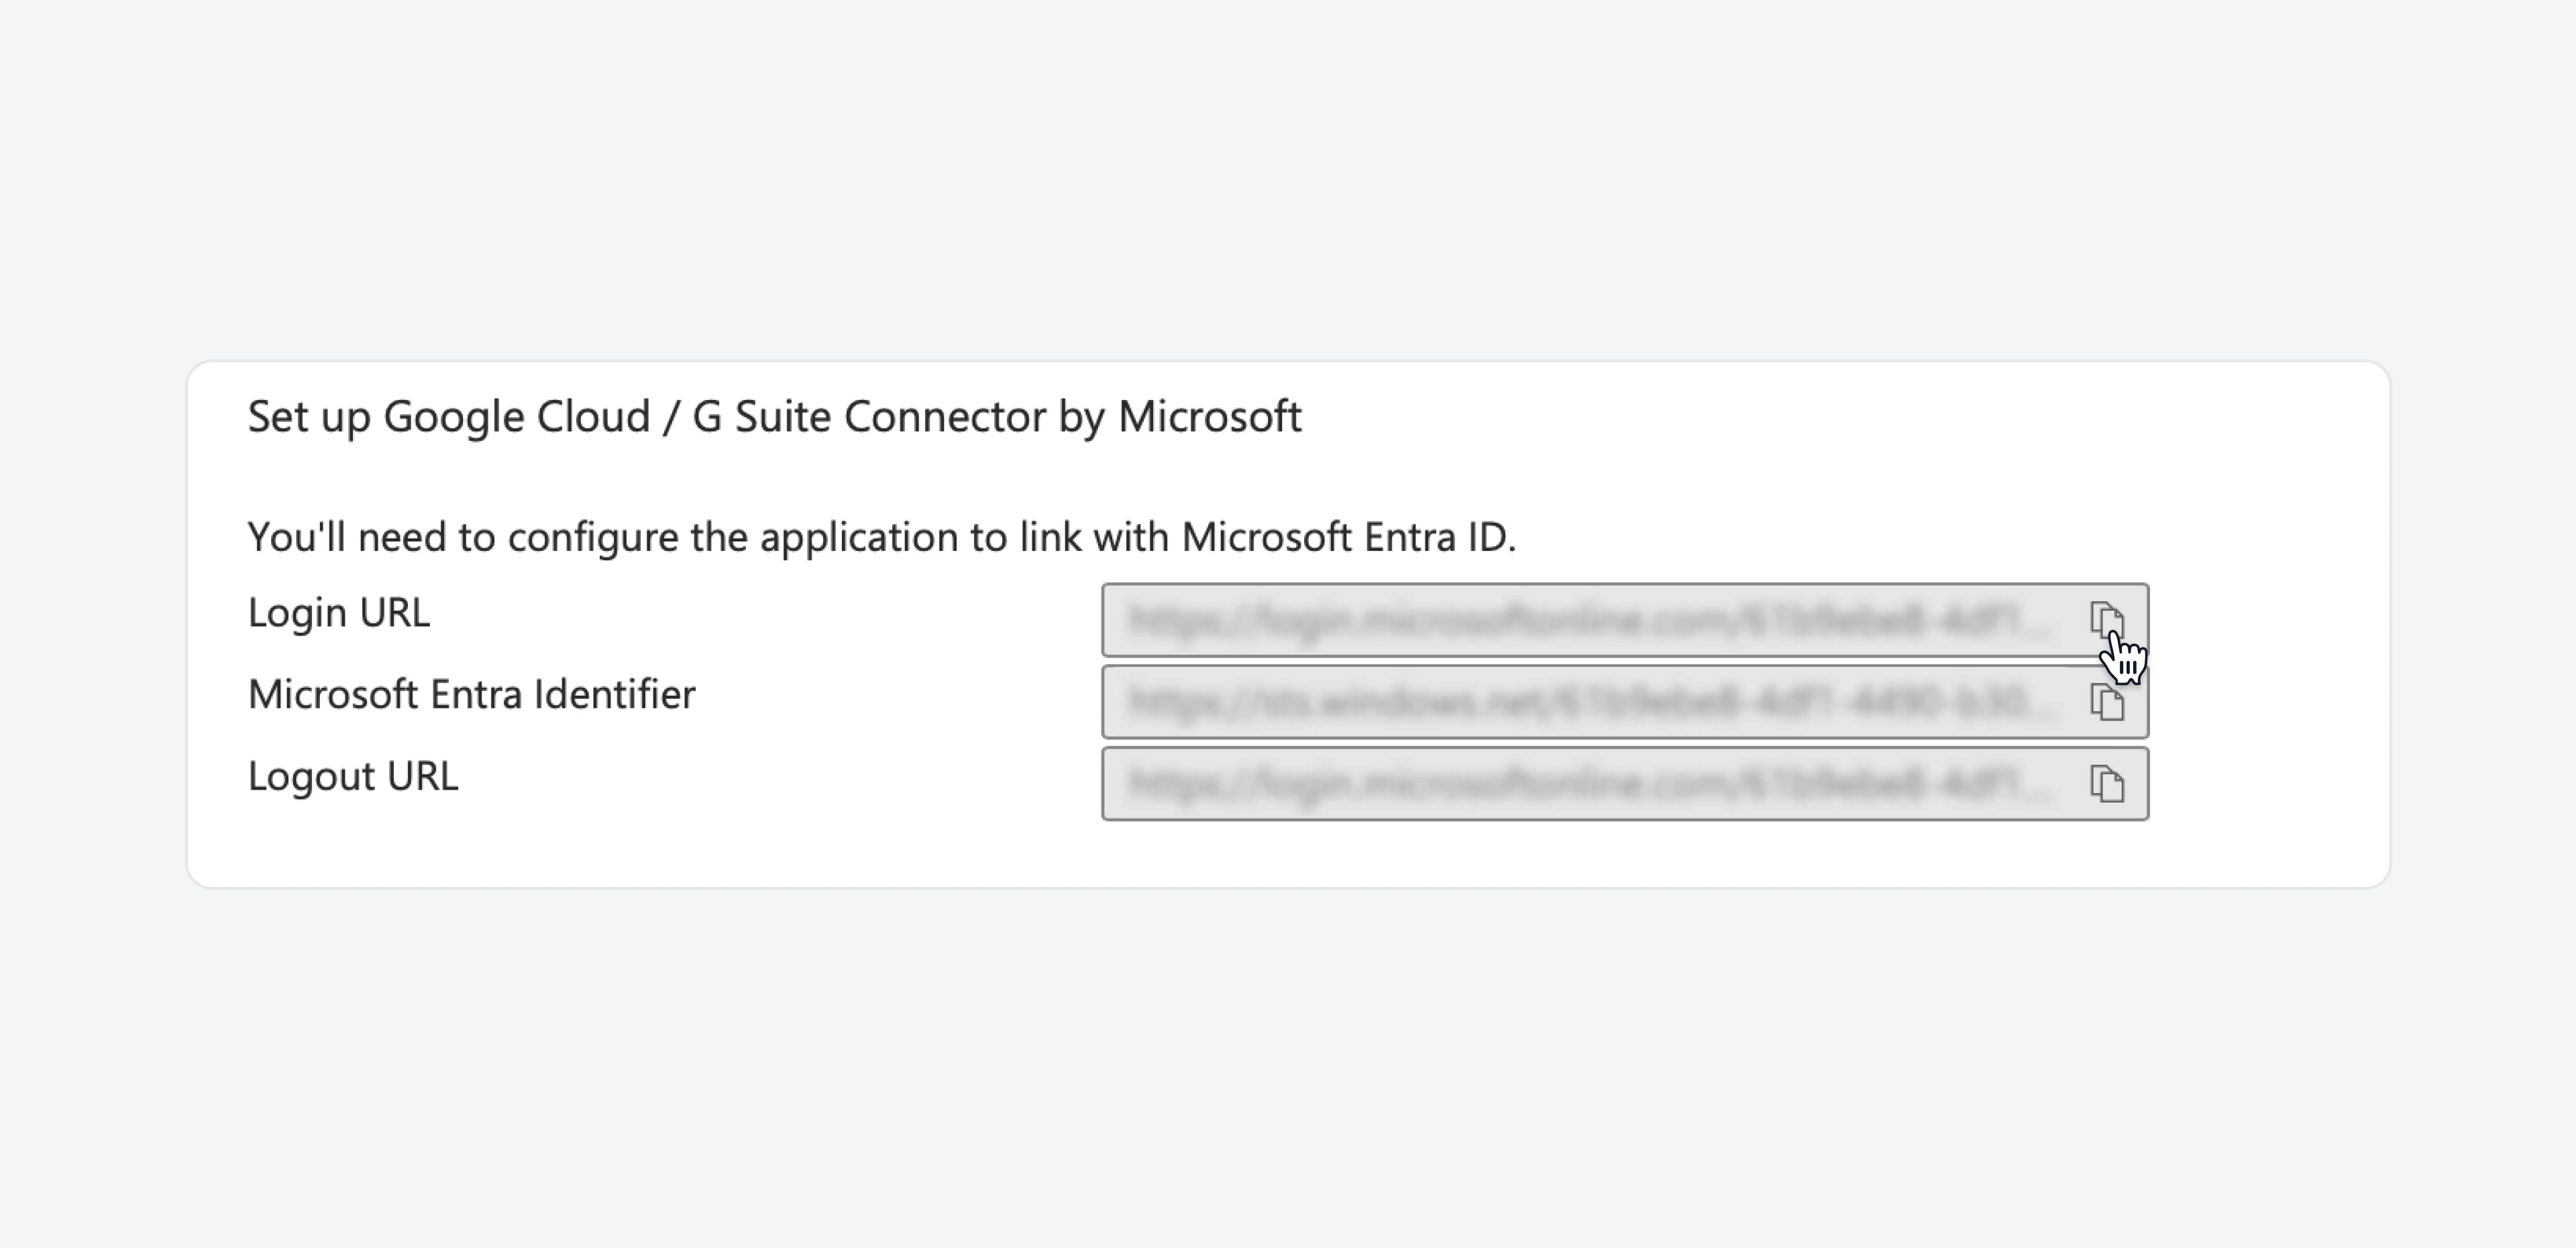
 * On the `Set up Google Cloud / G Suite Connector by Microsoft` section, copy the three URLs and save them, as we will need them to set everything up in Google Cloud. Alternatively, leave this tab open so you can go back to it quickly.
 ### Complete the SAML profile
* Return to the [Google Admin console](https://admin.google.com), and go to `Security > Authentication > SSO with third party IdP`.
* Open the `Microsoft SSO - SAML` profile that you created earlier.
### Complete the SAML profile
* Return to the [Google Admin console](https://admin.google.com), and go to `Security > Authentication > SSO with third party IdP`.
* Open the `Microsoft SSO - SAML` profile that you created earlier.
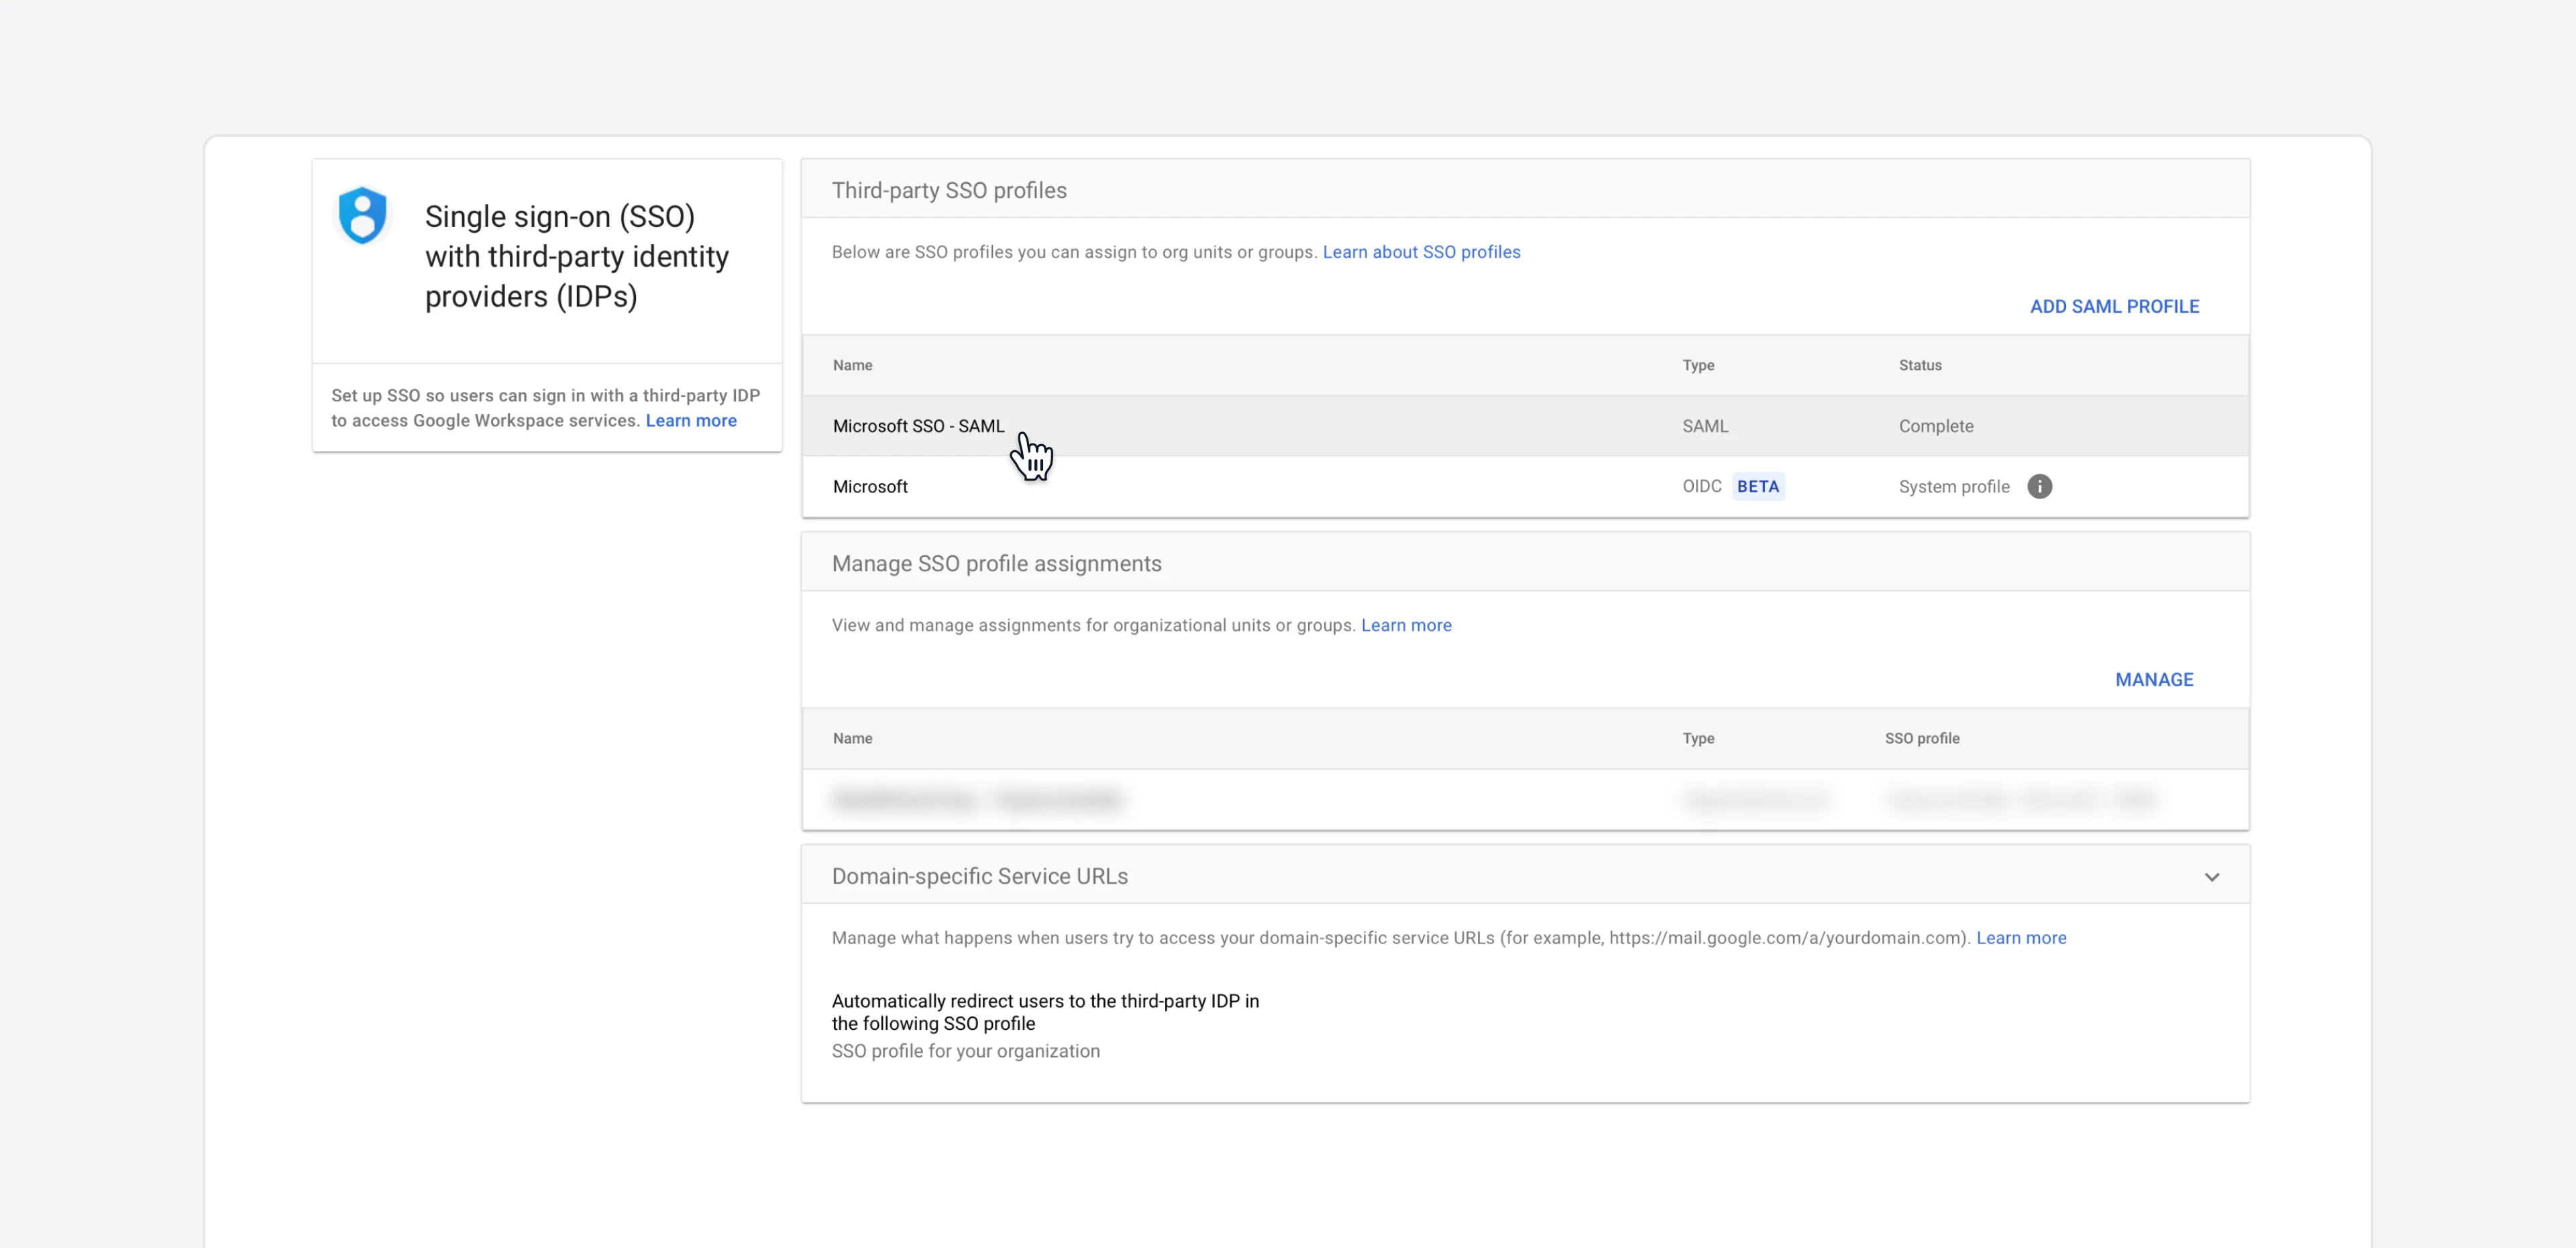 * Click the `IDP details` section to edit the settings.
* In the `IDP entity ID` field, paste the value of `Microsoft Entra Identifier` from the previous section.
* In the `Sign-in page URL` field, paste the value of `Login URL` from the previous section.
* In the `Sign-out page URL` field, enter the following URL:
```URL Change password URL theme={null}
https://login.microsoftonline.com/common/wsfederation?wa=wsignout1.0
```
* In the `Change password URL`, enter the following URL:
```URL Change password URL theme={null}
https://account.activedirectory.windowsazure.com/changepassword.aspx
```
* In the `Verification certificate` section, update the certificate that you downloaded previously.
* Once everything is filled, click `Save`.
### Assign the SAML profile
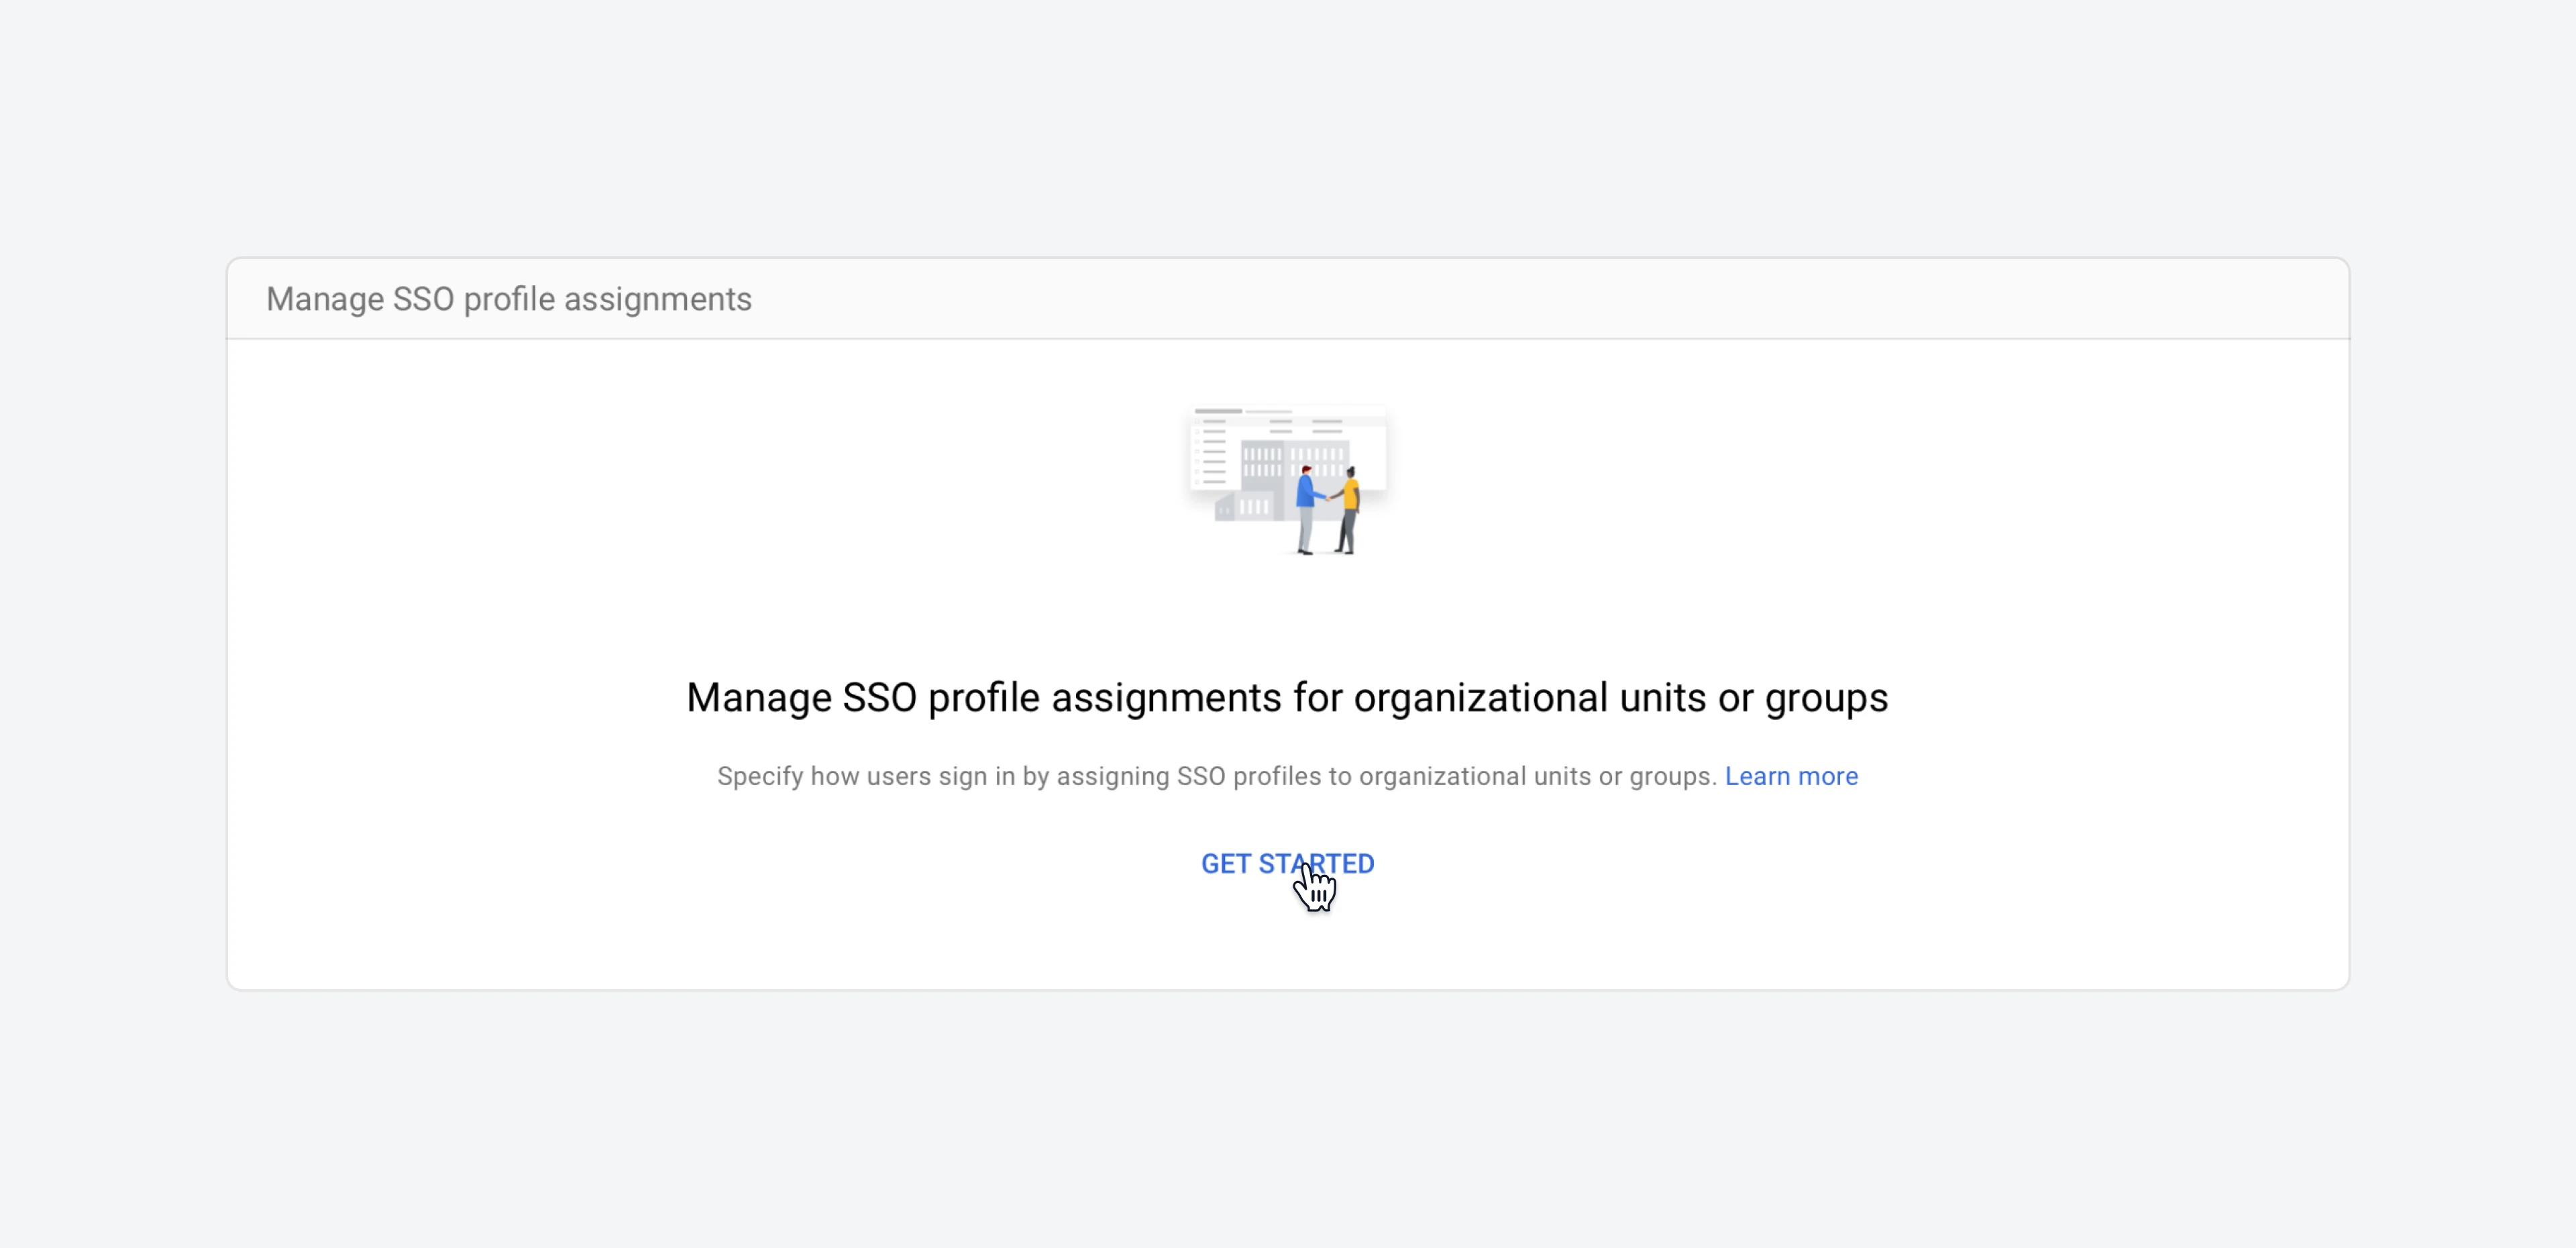
* On the `Manage SSO profile assignements` section, click on `Get started`.
* Click the `IDP details` section to edit the settings.
* In the `IDP entity ID` field, paste the value of `Microsoft Entra Identifier` from the previous section.
* In the `Sign-in page URL` field, paste the value of `Login URL` from the previous section.
* In the `Sign-out page URL` field, enter the following URL:
```URL Change password URL theme={null}
https://login.microsoftonline.com/common/wsfederation?wa=wsignout1.0
```
* In the `Change password URL`, enter the following URL:
```URL Change password URL theme={null}
https://account.activedirectory.windowsazure.com/changepassword.aspx
```
* In the `Verification certificate` section, update the certificate that you downloaded previously.
* Once everything is filled, click `Save`.
### Assign the SAML profile
* On the `Manage SSO profile assignements` section, click on `Get started`.
 * On the `SSO profile assignement`, click `Another SSO profile` and select the one you've created in the past step. If you've followed our recommended naming conventions, it will be called `Microsoft SSO - SAML` .
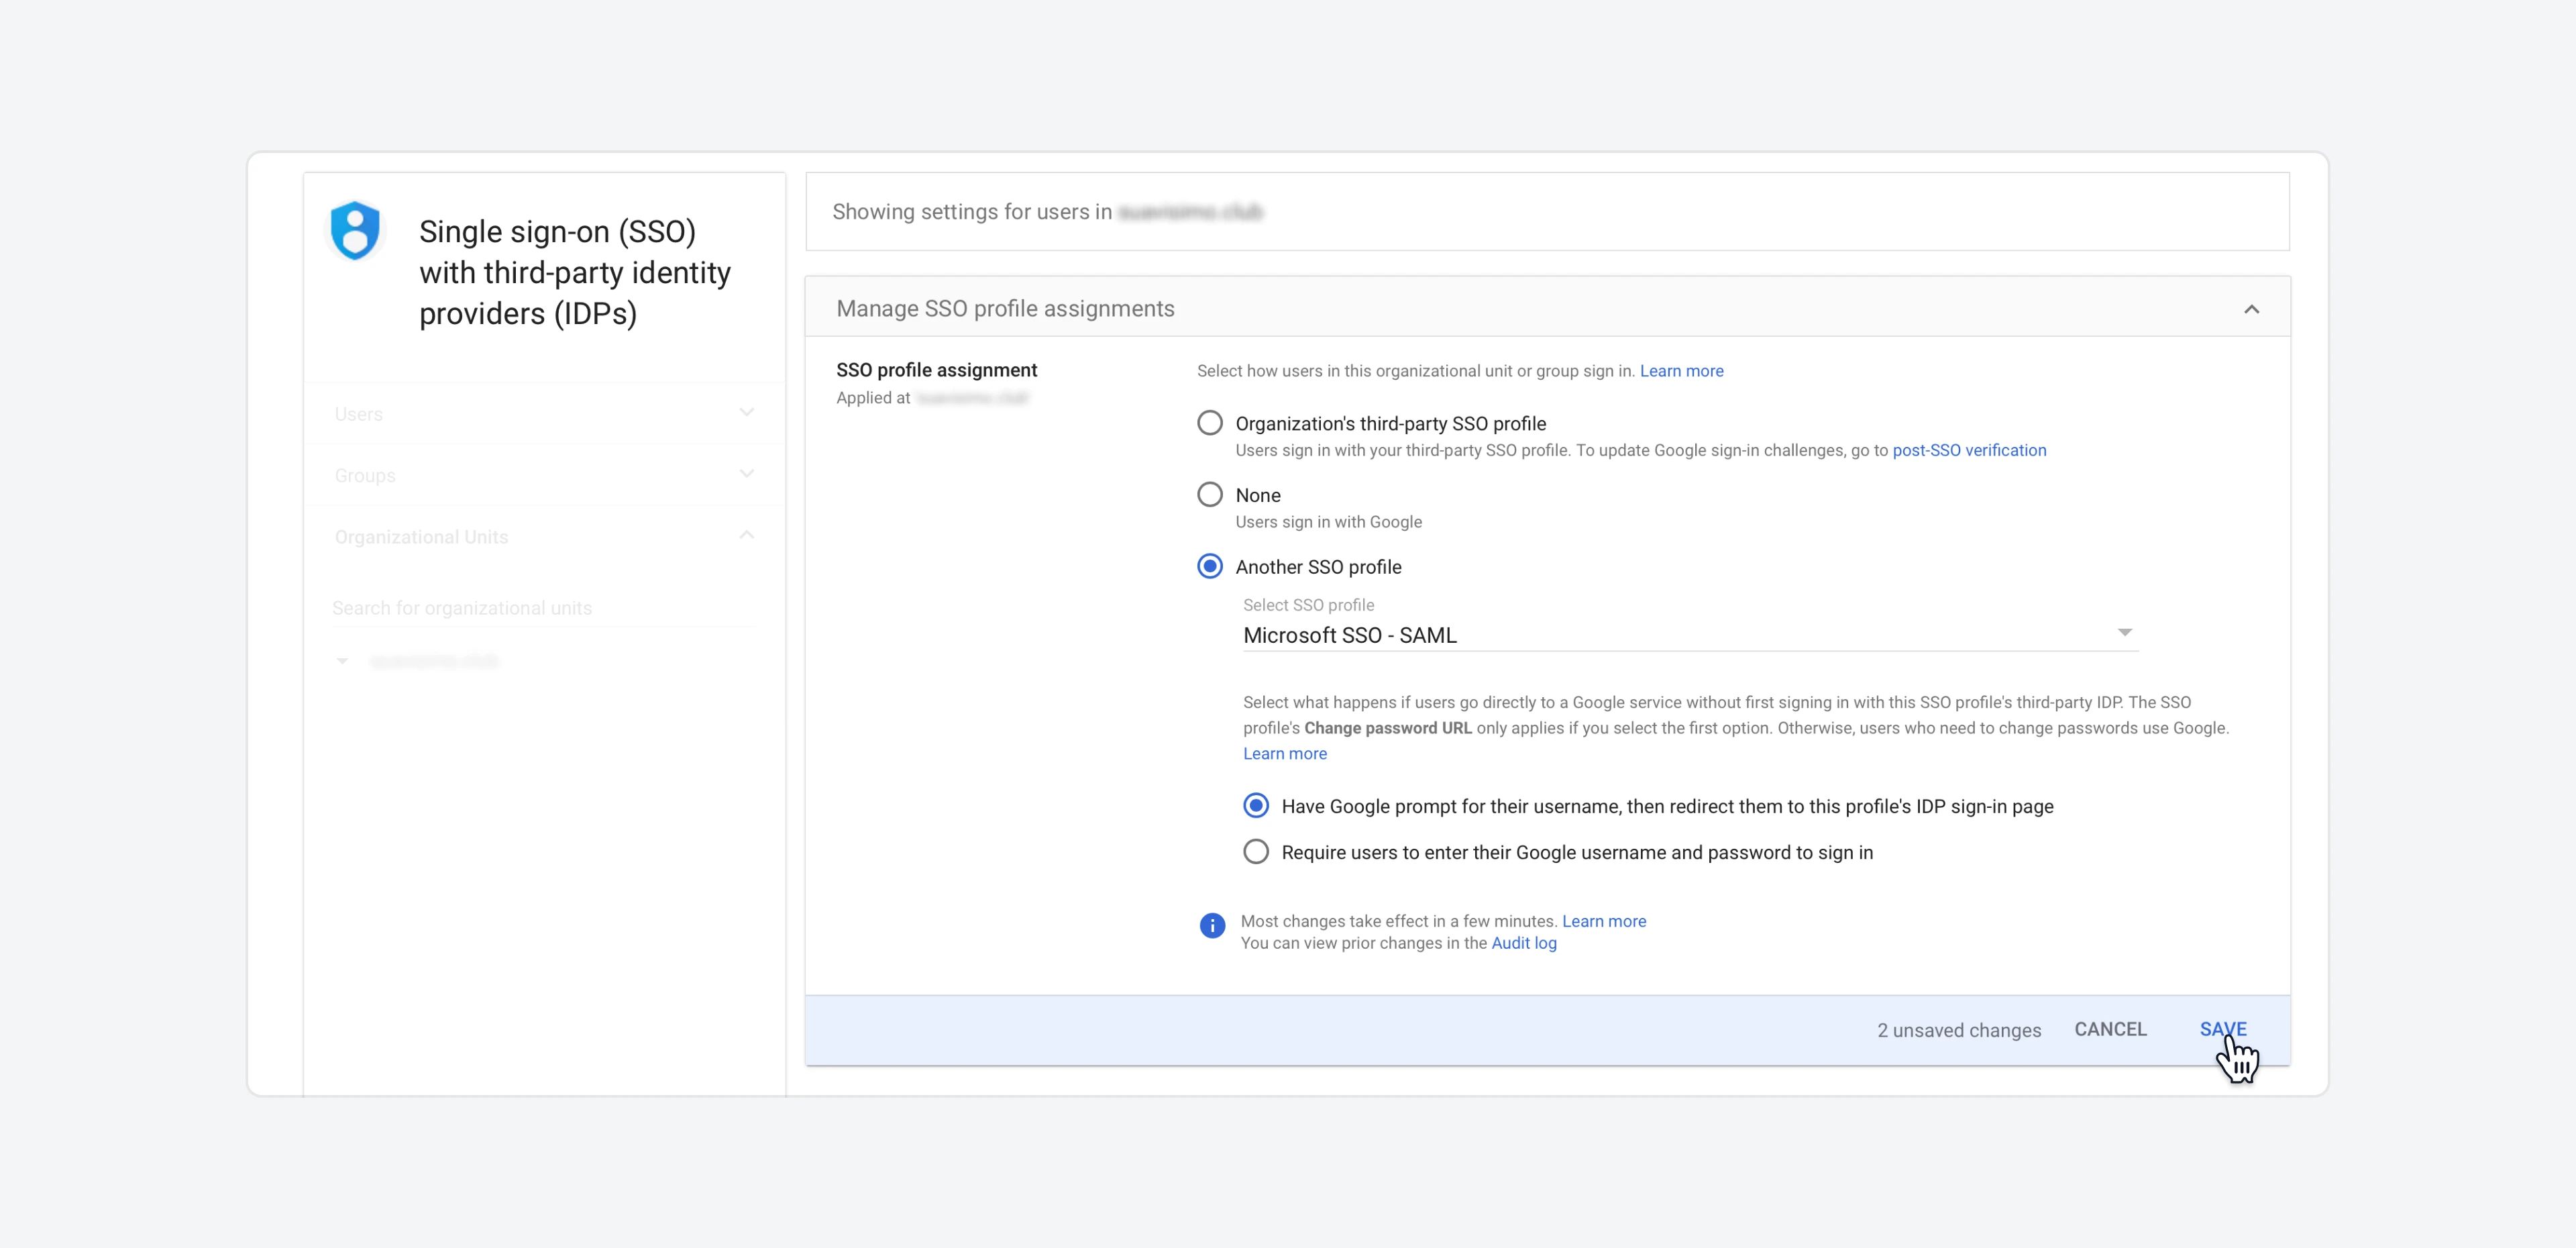 * Click `Save`.
### Assign users
#### On Microsoft's side
To enable users to use single sign-on in Google with their Microsoft SSO, you need to grant them access to the Google Cloud / G Suite Connector by Microsoft.
* Sign in to the [Microsoft Entra admin center](https://entra.microsoft.com/).
* Go to `Identity > Applications > Enterprise applications > Google Cloud / G Suite Connector by Microsoft`. There, go to the `Users and groups` section.
* Click `Save`.
### Assign users
#### On Microsoft's side
To enable users to use single sign-on in Google with their Microsoft SSO, you need to grant them access to the Google Cloud / G Suite Connector by Microsoft.
* Sign in to the [Microsoft Entra admin center](https://entra.microsoft.com/).
* Go to `Identity > Applications > Enterprise applications > Google Cloud / G Suite Connector by Microsoft`. There, go to the `Users and groups` section.
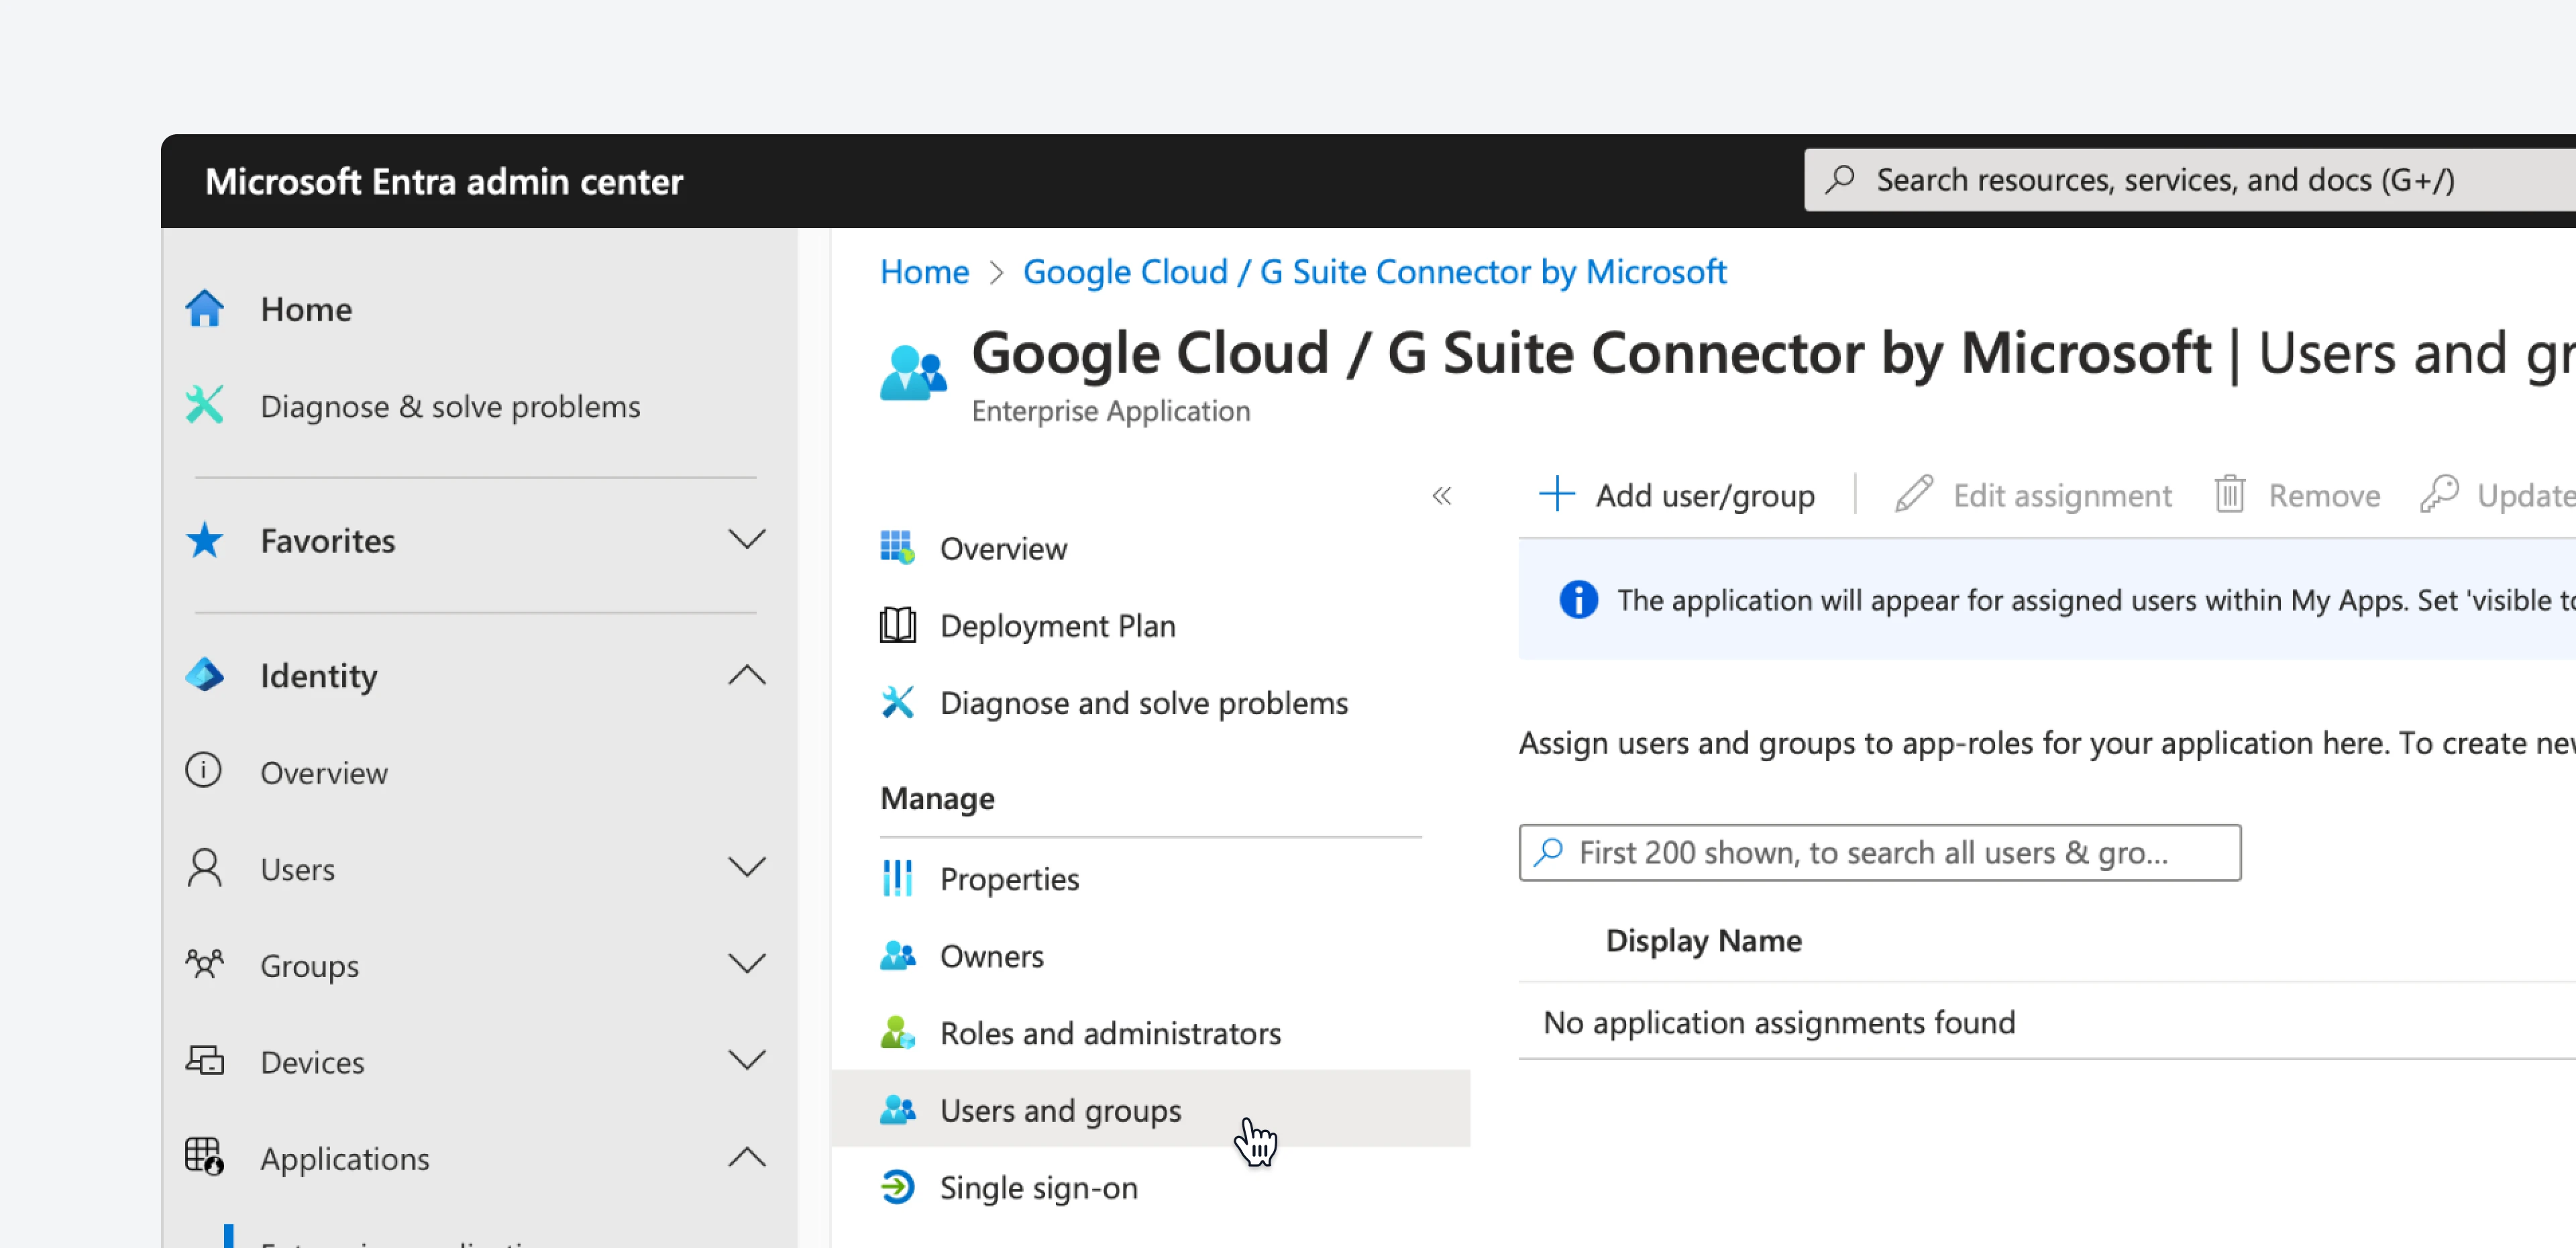 * Click on `Add user/group`, and then select the users and/or groups that you need.
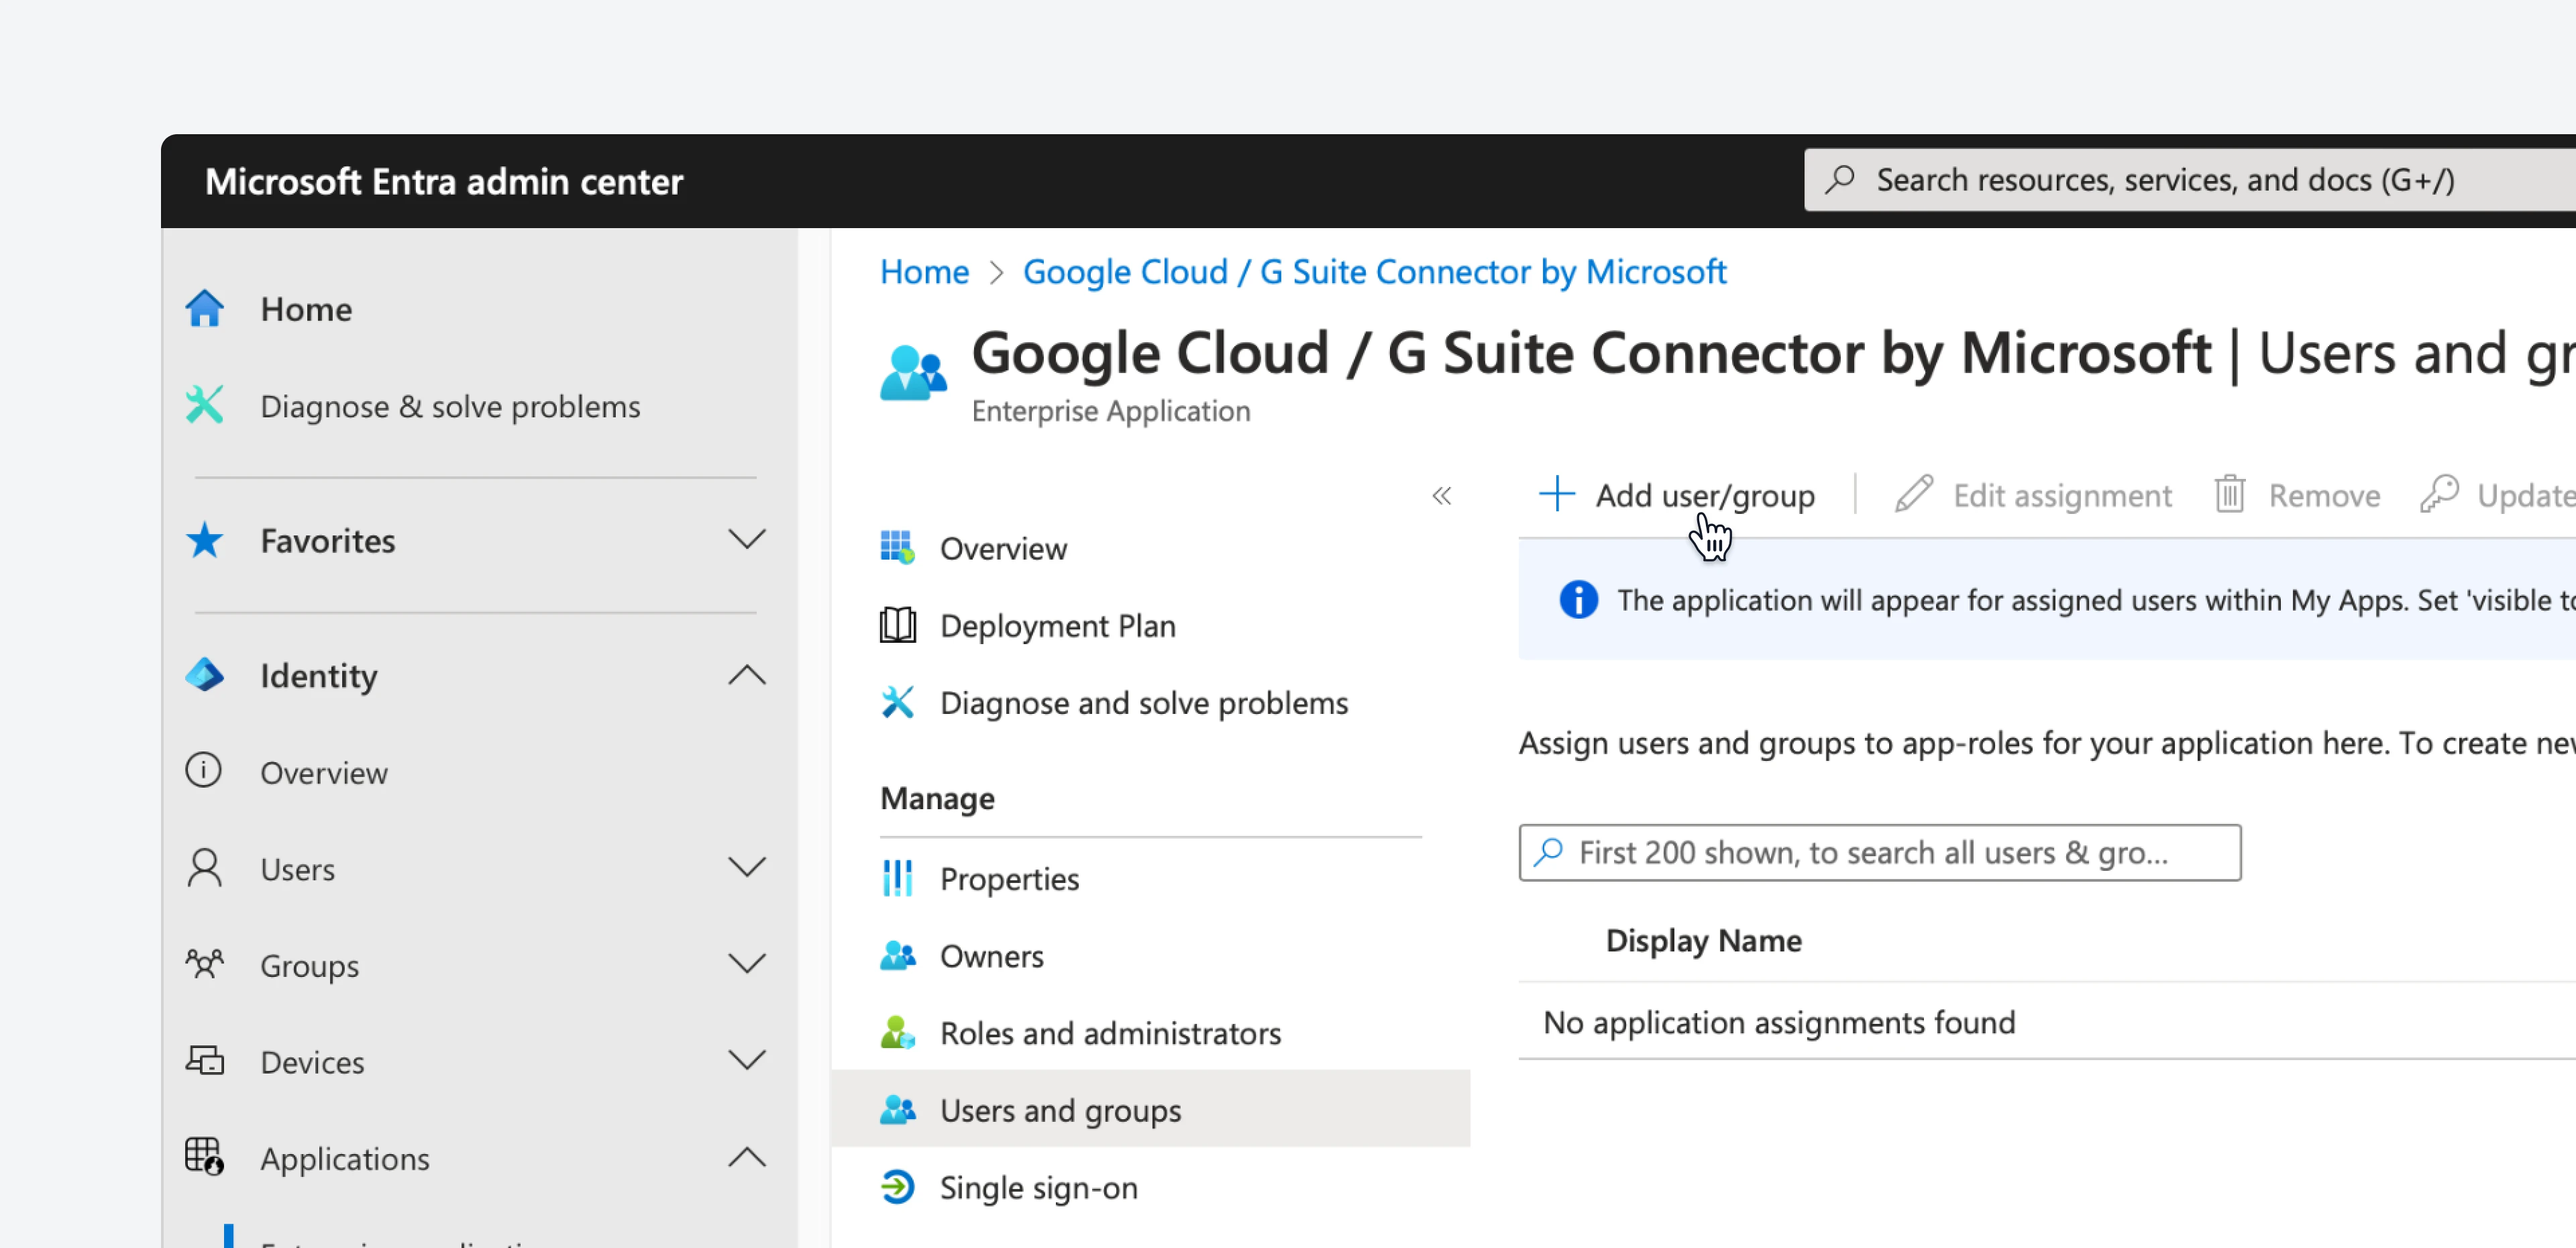 * Once you're done, click on the `Assign` button.
#### On Google's side
In order for this to work, the user needs to exist in both Google and Microsoft.
If you don't want to manually create users in Google when needed, you can also configure automatic user provisioning following [Microsoft](https://learn.microsoft.com/en-us/entra/identity/saas-apps/g-suite-provisioning-tutorial)'s or [Google](https://support.google.com/a/answer/10616183?product_name=UnuFlow\&hl=en\&visit_id=638581965678908134-1354919343\&rd=1\&src=supportwidget0\&hl=en)'s documentation.
### Test SSO
If you've followed this steps correctly, your users will now be able to login to Google services using their existing Microsoft SSO.
To test this, click this link. It will redirect you to the Google login flow. After inputting your email address, it will redirect you to Microsoft to complete the login process.
## Frequently asked questions
Yes, the SSO profiles can be selected per User, Organizational Unit or Group in the Google Workspace end. Only the users or groups you select will be redirected to Microsoft Entra ID for login.
No, you do not need to pay for each Google user. Google Cloud Identity accounts are sufficient for accessing Google services, so a Google Workspace license is not required. By default, Google assigns a Google Workspace paid license to new users, but you can disable automatic licensing by following [this guide](https://support.google.com/a/answer/1727173?hl=en).
* Once you're done, click on the `Assign` button.
#### On Google's side
In order for this to work, the user needs to exist in both Google and Microsoft.
If you don't want to manually create users in Google when needed, you can also configure automatic user provisioning following [Microsoft](https://learn.microsoft.com/en-us/entra/identity/saas-apps/g-suite-provisioning-tutorial)'s or [Google](https://support.google.com/a/answer/10616183?product_name=UnuFlow\&hl=en\&visit_id=638581965678908134-1354919343\&rd=1\&src=supportwidget0\&hl=en)'s documentation.
### Test SSO
If you've followed this steps correctly, your users will now be able to login to Google services using their existing Microsoft SSO.
To test this, click this link. It will redirect you to the Google login flow. After inputting your email address, it will redirect you to Microsoft to complete the login process.
## Frequently asked questions
Yes, the SSO profiles can be selected per User, Organizational Unit or Group in the Google Workspace end. Only the users or groups you select will be redirected to Microsoft Entra ID for login.
No, you do not need to pay for each Google user. Google Cloud Identity accounts are sufficient for accessing Google services, so a Google Workspace license is not required. By default, Google assigns a Google Workspace paid license to new users, but you can disable automatic licensing by following [this guide](https://support.google.com/a/answer/1727173?hl=en).